Showing posts with label instagram. Show all posts

Tuesday, 14 July 2020

My rainbow jelly quilt!


I saw this rainbow jelly roll quilt pattern, designed by ruby star society, on Instagram. Ruby star society hosted a quilt along and I was so desperate to take part. Unfortunately I had too many projects started already, but I couldn’t resist any longer, especially since it is a free download from the moda fabrics website here

Technically I didn’t use a jelly roll at all, which would have made it so much easier. Instead I stuck with my 100 days using cotton and steel project and used some of my stashed cotton and steel prints. My sister helped me raid my stash and find the fabrics that were long enough. We then put them into block combinations with little ombré colour groups and cut the strips to size. It took a while to cut out but it was worth the extra effort. I also made more work for myself by making 2 extra blocks (20 more stripes) to make the finished quilt longer. Luckily, I wasn’t too difficult to piece together although the blocks are quite large and I wish my quilting ruler was longer for the sub cutting! I'm pleased I made it bigger though as it definitely makes it a more useable size for us as a family. 


We had a nice bit of sunshine when I finished the top so I managed to get photo in the garden before it was sent away to be quilted. I sent it away to Cath at Cumbria long arm quilting for some of her magic. Although the quilt wasn't huge, I didn't really fancy quilting it myself and I love the swirl design we picked for the quilting. The swirls are much more decorative than I could do and think they work lovely with the patchwork. Cath attached the binding to the front and I sat with a few films to hand stitch the binding to the back. 
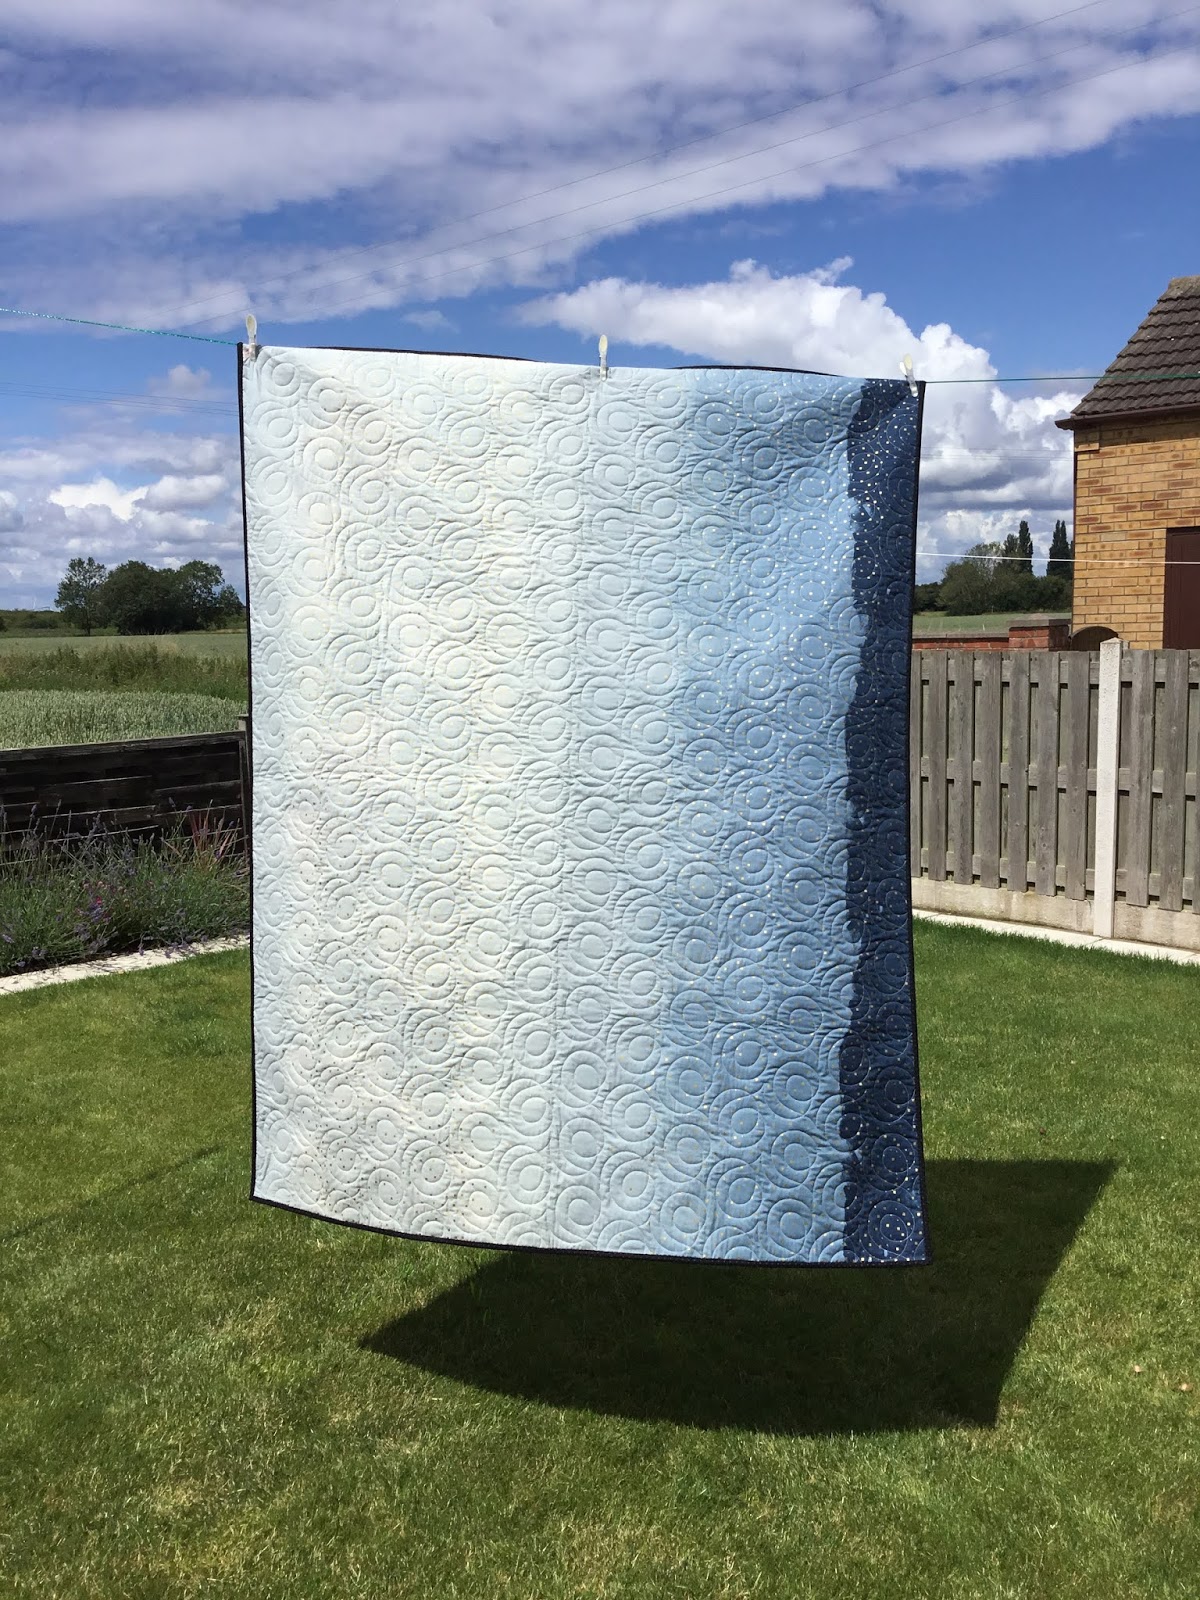

I am so pleased with my final quilt and it is on the sofa with my catty corner quilt, looking great together!

Mx

Sunday, 26 April 2020

scrappy triangle cushion

I made this cushion using my cotton + steel fabrics as part of my #100dayproject on Instagram. I grouped the fabrics into colour families and pieced half square triangles around a central economy block to create the design. The cushion finishes up at 18". If you would like to make your own, here's how to do it …


To create the patchwork, you will need to cut: 

1 blue square @ 4 3/4"

4 yellow triangles
8 navy triangles
20 cream triangles
20 pink triangles
12 peach triangles
4 teal triangles

 For the half square triangles, I use the easy angle ruler and cut to a 3 1/2". If you don't have this ruler, cut squares at 3 7/8th" and split on the 45 degree angle. 


For the economy block, position the first two triangles opposite each other, RST onto the central square. Align along the outer edges, pin and sew. Press open, then repeat for the remaining two sides as seen above. Trim the finished block to a square (this should be 6 1/2"). 


 To construct the half square triangle blocks, place two triangles RST, pin and sew along the long edge. Press open and trim to a square, removing the dog ears on the corners. Ensure all of the half square triangle blocks are the same size (this should be 3 1/2"). 


To put the cushion top together, I like to lay out all of my cut pieces to check I'm happy with the layout. I then stitch the centre block, followed by the surrounding half square triangles. I like to chain piece, so I prep all of the blocks and then stitch and press in stages. To join the blocks, I group into 4 patches around the centre, then piece together as shown above. 


I chose to hand quilt the top to highlight the diamonds created by the colours. I used aurifil 12WT and echo quilted, using a large quilting hoop to help with the tension as I stitched. Of course, you could machine quilt if your preferred. 


To finish the cushion, I created a concealed zip back (tutorial post here) and bound the edges with 2 1/4" binding (binding tutorial post here) for a neat finish to coordinate with my catty corner quilt (see here).


I'm pretty pleased with how this turned out and Millie approves too. I hope this blog helps you to create your own version. Of course, you can switch around the colour schemes for completely different looks to make use of your fabric scraps. 

Mx

Wednesday, 8 April 2020

My #100dayproject!


For the last few years I have joined in with an Instagram based challenge called the 100 day project. You get to choose your own project or goals and for 100 days you work on them and post daily photos. I’m never very good at the daily posting but do love a nice challenge and setting myself goals. The best thing about this is you get to pick your own project to work on.

I’m sure I have mentioned before, I’m making an all cotton and steel, EPP ice cream soda quilt. It’s a fabulous pattern and a long term project, but because I wanted a nice scrappy feel and a total celebration of cotton and steel, I needed lots of prints. So I started collecting, mostly bought as fat quarters or scrap packs, but also swapped or kindly gifted fabrics too.
My stash is now pretty huge and I feel like I need to use some of it up...well a lot actually. With that in mind I have chosen my project for this year, #100daysusingcottonandsteel ! I have a plan including a lot of things I’d like to make. Hopefully I will get them all finished, however, I doubt it given the fact I’m including a couple of quilts. Not my ice-cream soda quilt, that would be just crazy! I do plan to sew some blocks though.

I got far too excited planning my project and have already spent quite some time selecting fabrics and lots of cutting preparation. Given the fact I got distracted doing this and forgot about a couple of gifts I needed to make, I am going to set aside a couple of days off during my 100 days to make those. 

So an outline of my project :

Try and use up as much of my cotton and steel stash. Make as many projects in the 100days as I can. Try to post daily, probably in my story and completed projects on my feed. Most importantly, use my stash and have fun!

Now onto the projects I want to make :
  • A postage stamp/sampler style quilt. This will hopefully be a square of every cotton and steel fabric I currently own.  I’m hoping this will be a bed sized quilt so I will try to do the top and maybe the back, but will probably send it away to be long arm quilted and doubt it will be back in time to be fully complete. (I don’t know when this will be given the strange circumstances we are currently in).
  • A wonderland quilt. I don’t have enough to have a bed sized quilt but I should manage a nice lap size. I will try to quilt and bind this one myself, hopefully finished in the 100days.
  • A patchwork tote bag. I have made a couple of nice tote bags lately and really want one of my own.
  • A scrappy triangle patchwork cushion.
  • My unicorn retreat pouch and maybe a couple of other pouches.
  • A pin badge banner, just because.
  • I will also do some slow stitching and work on my ice cream soda quilt blossoms!
  • I’m sure a few other bits will be made along the way too, maybe even another couple of quilts... let’s see how it goes...

So let’s see what I can do over the next 100 days using cotton and steel!
Mx


Saturday, 14 March 2020

Birthday stitchers swap 2020... what i made!!


I decided to take part in the birthday stitchers swap on Instagram again this year. I was so pleased to be making for one of my close friends again too! I had so much to choose from the inspiration mosaic Zena made, it was full of fun ideas and I was quickly excited to get started. 


For the main make I chose to make a quilted tote bag with strawberry patchwork. I used similar construction to the previous one I had made, but changed the measurements (I'm hoping to do a tutorial blog for this soon!). I knew Zena had already received a larger grey tote, so it would be nice to make something different and a bit smaller. The smaller size also made more sense to fit the size of the patchwork strawberry


To make the bag I used red and green scraps for the strawberry patchwork and Everglades by Betsy silver for Michael Miller for the white. I added an Essex linen in ‘midnight’ to finish the bag outer nicely. For the lining, I used Strawberry tea by Axelle design for Michael Miller and added a slip pocket inside. This print felt like the perfect match for the patchwork design on the outer. I picked the Aurifil thread in shades 2745 & 2021 to use as I thought the colour matches were great


For the small makes, I started with a medium sized sewing case as Zena had included a few similar ones on her mosaic. I didn't want to purchase another sewing pattern, so I just made it up as I went along. I'm pleased with how it turned out, (although I'm sure there was a lot easier way to make it, so I wont go into that!) 


The main feature of this make for me though was the EPP. I didn't want to do just regular hexie shapes, but I don't feel quite ready for anything as fancy as clam shells. I decided a honeycomb was a nice option, it was a little different but still in my comfort zone. It also worked very well with the fussy cut images that I wanted to include. I felt it would be too much to make the entire case from patchwork, so I opted for a panel on each side instead. I joined my EPP shapes together, appliqued them onto the linen, then quilted over the top. This was the first time doing something like that and I'm so happy with how it looks. I used several prints from the Penny Rose fabrics 'bunnies & blossoms' by Lauren Nash range, some cream/ natural linen (I cant remember the shade colour) and Aurifil thread '2311'. I know Zena likes to add extra details into her makes, so I thought it was only right I did the same when making for her too. I made zip charms using some strawberry shaped beads and handmade hearts. I also used a single honeycomb shaped piece of fabric, appliqued on to the inside with stuffing in, to create a mini pin cushion!


Next was a small drawstring pouch with a pocket on the front. To make it, I used some cotton + steel fabrics. Zena said she likes neon's and I knew I had some prints that I had bought without a plan of what project to make with them. This seemed like the perfect opportunity to use them. I liked using the different prints but felt like they blended a bit to much, so I went in search for some trim and ribbon. The neon was a struggle to find and it isn't a perfect match, but it's close enough to make the pocket look pretty and fasten the pouch.


The last little make was one of my mini travel pinnies.  I used the Riley Blake 'little sweetness' range by Tasha Noel, which I know Zena loves and managed to fussy cut the little dresses for the front to really make a feature of the print. The extras that I bought for Zena was a Cath Kidston mug, a 'z' candle and some charms. The best gift wrapping for any sewist is fabric of course, tied with a big ribbon. I also made a little scrappy keyring that served as a gift tag! 


It was a pleasure making everything and I'm pleased to say Zena loves her gifts. More photos of her gifts are on my @craftylilmouse Instagram account and you can go see all the beautiful things Zena makes on her account @mycreativepottylife too!
As for my birthday stitchers swap parcel, I still have a while to wait. I am already getting excited and will share those as soon as they arrive...

These projects were on my finish-a-long list, so I can tick them as complete!!

Mx


Sunday, 1 March 2020

mini travel pinnie


Last year I took part in an Instagram sew along called #teenytinypinnieparade and created this special pincushion.
It has magnets inside to be able to attach to clothes or car seat belts for travelling. With features including a puff for pins and needles, plus space to attach binding clips to the side it is just perfect for me.


It worked out so well, I  made a few as little thankyou gifts. I then decided I liked it so much, others might too, so I would make it into a pattern. 


It is available (as an instant digital download) on my etsy store if you fancy making one too!

Mx
 

Friday, 27 December 2019

Bunnies and blossoms pouch


I decided to take part in one Christmas swap this year, but wanted something a bit easier than last year. The #simpleandsweetchristmaspouchswap was perfect!
The guidelines were one pouch made to your partners preferences, with a nice size limit (maximum size 15”x12”, minimum 8”x6”). The parcel could also include 1 or 2 Christmassy extras. I was given Naomi as my swap partner aka @naomic08 on Instagram. I was very happy to be making for her, since she had made a wonderful cotton and steel swap parcel for me... see this here. 


Firstly, I decided I would make one of my snappy zip pouches but would enlarge it a little. My final pouch measurements were 10 1/2”x 9 3/4”. I couldn’t decide what fabrics to choose, so I gathered a few options and posted about it on Instagram. I had been eager to use these cute bunnies and blossoms fabrics for a while and was thrilled when Naomi commented she liked them too.  

 
I went for a patchwork panel, to include plenty of the fabrics with a few cute fussy cuts too. Simple straight line quilting, 1/2” apart worked out well too. I used the strawberries for the main pouch lining and the pink lace check for the flap and zip pocket lining. I decided not to quilt the flap and am pleased I didn’t now.


I found the sweet little strawberry bead in my jewellery supplies and made a cute zip pull charm with it. I love the way this pouch looks and hopefully Naomi does too!

My pattern is available on Etsy here, if you fancy making your own version of this pouch.
 
This was also one of my finish-a-long projects. See more of my list here, and visit their blog for more details about the challenge. 


Mx

Tuesday, 10 December 2019

a Christmas banner...


This Christmas I am taking part in the #simpleandsweetchristmaspouchswap on Instagram. For the swap you needed to make one pouch and up to two Christmassy extras. More about the pouch I made later, but here is the first of my extras.
 

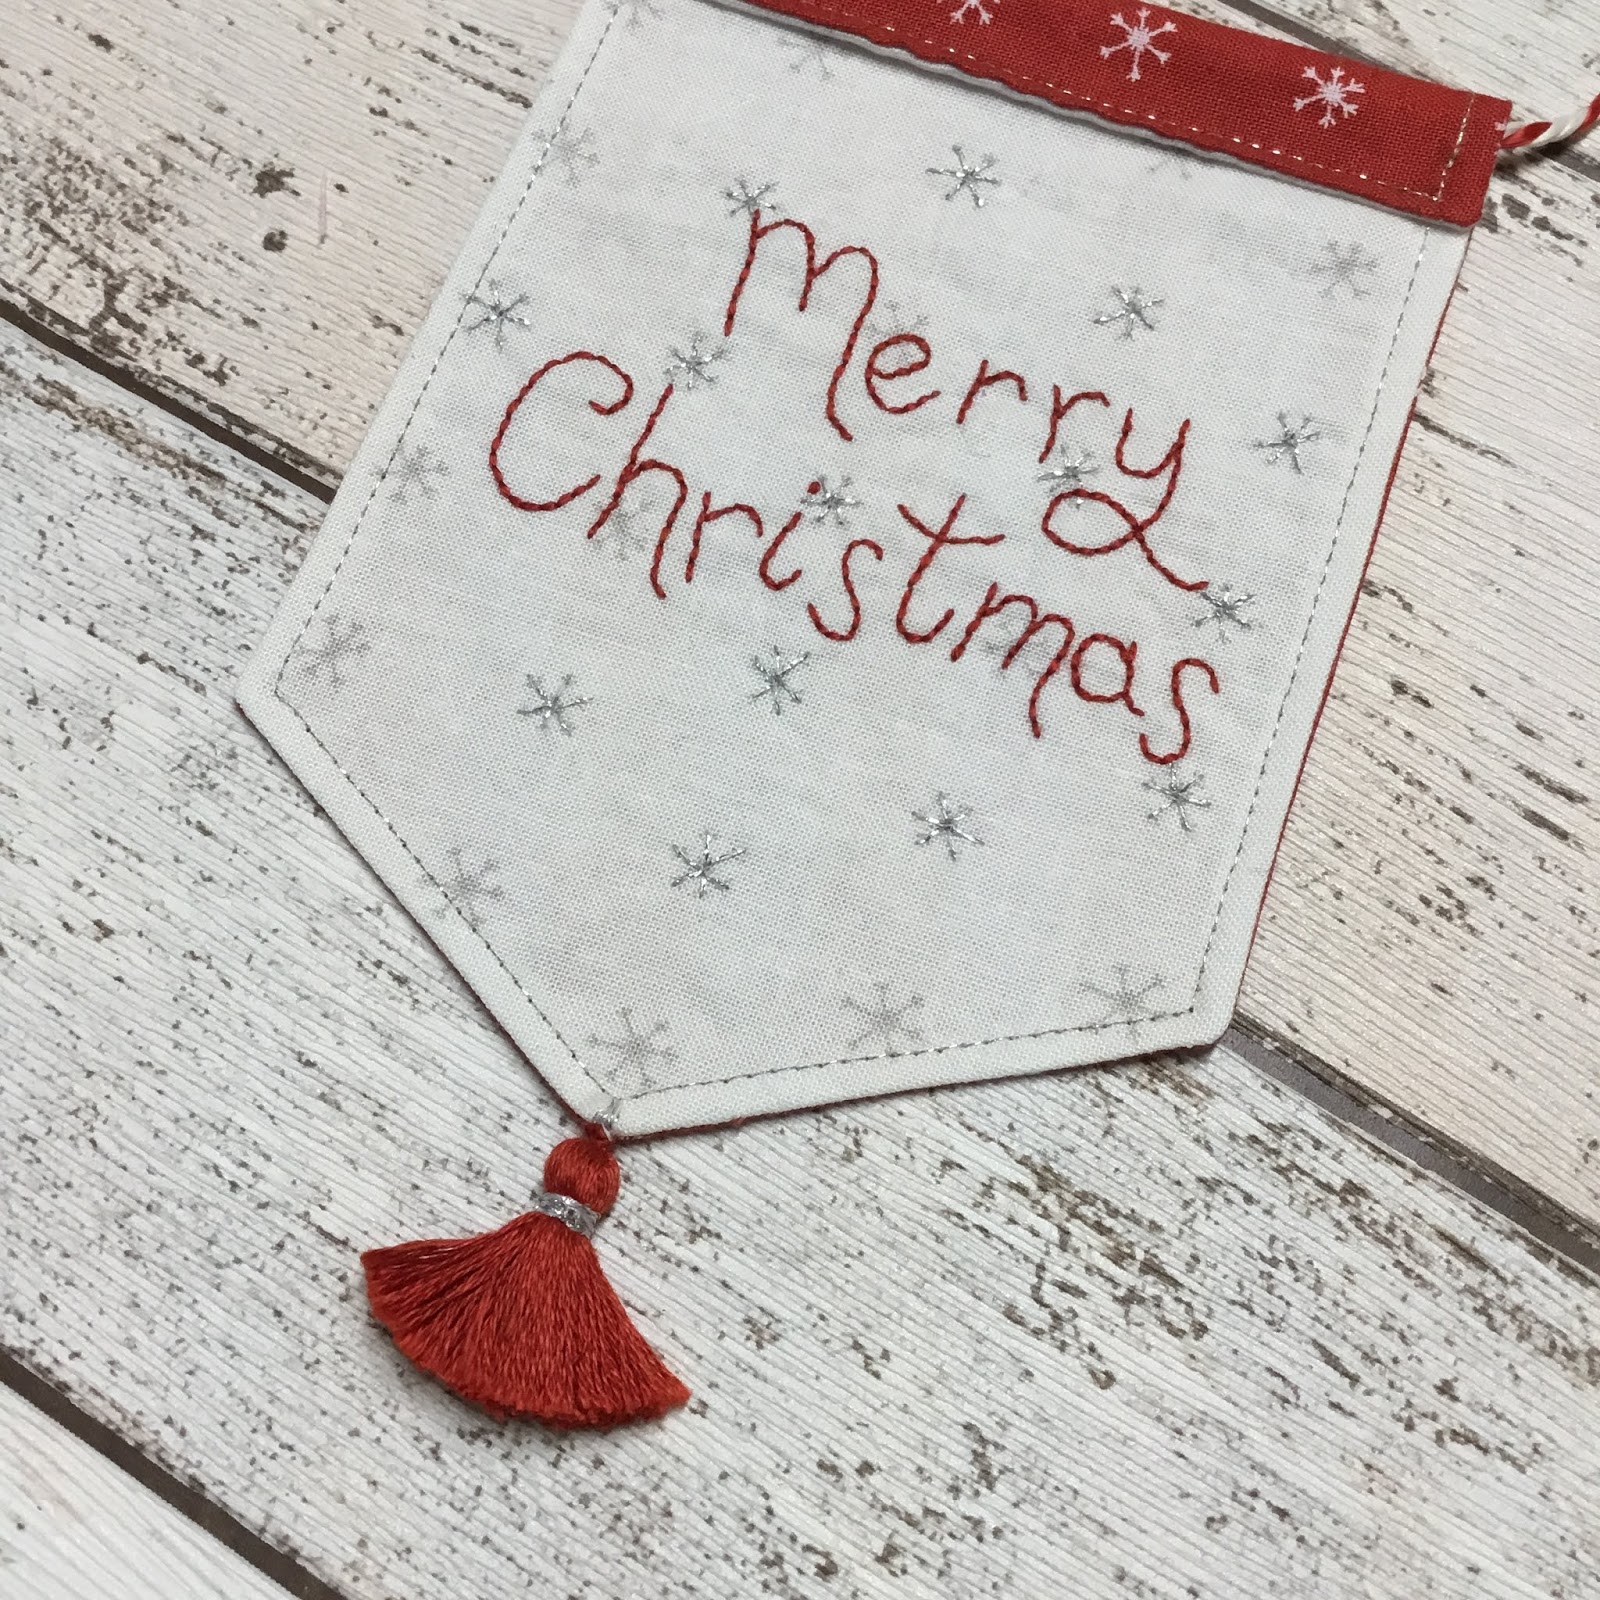
I made this little Christmas decoration banner. I used some of the moda merriments fabrics I had left over from my escape and create blog project (read about this here). Since my partner didn’t want too traditional, I thought this was quite a good choice with the snowflakes. Since the colours were still abit traditional though, I tried to hand letter the ‘Merry Christmas’ in quite a modern style.
I hand stitched the letters with a coordinated thread colour, then added sparkle with some silver thread over the existing snowflakes.
 
 
Once I’d finished stitching, I placed my two fabrics right sides together and drew my banner shape. I stitched along the lines, leaving a turning gap, then trimmed excess bulk from the corners. I turned it out and gave it a good press before stitching closed the gap. I used the silver thread again to top stitch around the edge of the banner. I folded over the top and top stitched in place. I added a section of paper straw inside the fold to hold the banner and threaded some twine through for hanging tied with a little bow in the top, so my partner can either hang it straight up or re-tie it around something.
 
 
The banner needed one final detail though... a tassel. Since I didn’t have one and wanted it to match, I decided to make my own. Although I’m happy with the results, please remind me not to do this in future! If you would like to make your own, I've included the template for the lettering below.

 
This is one of my Q4 finishes for the finish-a-long challenge, read more about my list here.

Mx

Sunday, 9 June 2019

zipped cushion tutorial

Since I'm running a cushion swap over on Instagram, I thought I would share a quick tutorial on how I like to make a nice neat zipped cushion back.
 
 
Start with a zip longer than your cushion width. Cut a piece of fabric approximately 2" high by the width of the cushion for the bottom of the back. Lay your zipper teeth down onto the right side of the fabric strip and pin in place, so the zipper tape lines up with the top edge of the fabric. stitch along the edge using your zipper foot on your machine to help. Fold the fabric back, press and top-stitch along the edge of the zip. For the larger top section, cut your fabric to size across the width, but add extra (approximately 2")to the height to cover the zip. Lay the zip teeth down onto the right side of your other cushion back, so the tape aligns with the fabric edge. Pin and sew.


Now at each end of the zip, you are going to sew an 'L' shape to stop the zipper and create the concealed fold. With your fabrics still right sides together and the zipper in the centre with the pull in the middle, mark out up to 2" in on the width along the zip and up to 1" down (or the width of the zip tape). Do this at both ends of the zip, and then sew along your marks, ensuring you run across the zipper teeth a few times to make it extra secure. Now fold back your fabric and press carefully over the zip. Next, top stitch along the other side of the zip through the fabric flap, lining up along the zipper teeth to hold the layers in place. Then, trim off the tape in line with the fabric edge and snip down either side of the tape carefully to avoid the fabric. then cut across to remove the teeth from the L shape sections to reduce bulk on the seams. Make sure your cushion back is the right size and square.
 

 To join the back to the front, you first need to decide if you are binding the cushion or not. Above shows a cushion ready to be bound, with the front and back pieces simply aligned wrong sides together and a stitched line around the edge, less than a 1/4" from the edge to hold the layers in place. You can then trim the sides neatly and sew on the binding of choice to finish, covering the joining stitching around the edge. If you don't want to add binding, place your front and back right sides together, with the zipper open and stitch all the way around using a 1/4" seam allowance. Turn the cushion through the gap in the open zipper and press. For a nice alternative to binding or piping, you can topstitch around the edges around 1/4" in on the turned through and pressed cushion.


Mx


Tuesday, 14 May 2019

Liberty kantha cushion


I had seen the #libertysocietykanthastitchalong on Instagram last year...A chance to use some of my liberty fabric stash and try something I had never done before. Lots of beautiful projects were made last year, but I didn’t get chance to join in so I was excited to get started this time round.
I patch-worked my panel on the machine, using some of the liberty scrap packs I had bought from duck egg threads online. I then chose my batting and added a piece of white cotton, to make my quilt sandwich. I chose a few colours of #8 perle threads. It was my first time using these too, with a slight sheen, they where easy to stitch with. I used my add-a-quarter ruler to keep marking a guide line with a clover Hera marker. 
Unfortunately the quilt for nanas 80th birthday took priority, so I only got time to finish my panel while the sewalong was still running. I should have picked a smaller project but I just knew I wanted a cushion. To make up the cushion, I used a bigger piece of liberty tana lawn to coordinate with the front. Since I didn’t want to bind the cushion, I just did the turn out method, but it didn’t quite look right. I top stitched a border about 1/4” from the edge and I think this was the finishing touch it needed. 
It was quite relaxing to do the kantha stitching and gives such great texture. I also think it was quite good practice for if I wanted to do some hand quilting in the future. The liberty is so soft and the overall cushion feels very luxurious. I love it and am so pleased I took the time to make it.


This was one of my Q2 finish-a-long projects. If you want to read that list, click here!
Also if you fancy looking at some very beautiful projects similar to mine...Go to Instagram and check out #libertysocietykanthastitchalong, which was hosted by the lovely @tincatsew.
Mx


Wednesday, 3 April 2019

Send a little love swap...

I signed up to take part in the IG based swap for valentines. It was the #sendalittleloveswap2019 which was a quite fun little swap to take part in. I signed up just before I made my Q1 finish-a-long list so I decided I would add it to my list. I knew it would be an easy finish since I hate to let people down, so I knew it would be completed on time. This Blog post about it is little bit late though. I have the worst memory and basically forgot to write it til now when it’s time to link up our finishes. I would forget my own head if it wasn’t screwed on!
On to the swap...
It was a small swap that was to be love themed and opened on Valentine’s Day. There was a £10-£12 budget and you needed to include:

  • A heart shaped item
  • Something edible 
  • Stationary 
  • Craft notion
  • Handmade item

I was partnered with @susyb65 and her inspiration mosaic was brilliant. There were so many wonderful ideas , I was very tempted to do a few of them. The swap did say 1 handmade item though and given personal time restrictions I decided it was best to just make the one thing and buy the others.


I found a very simple ceramic hanging heart decoration, it was embossed with the word love and I thought was quite nice. I had noticed we shared the love of malteaser buttons so got the biggest bag I could find. For stationary I found a couple of notebooks with hearts on and thought they were so lovely (wish I had bought myself some too) of course I just had to include a coordinating pen too. I was spoiled for choice when it come to picking a craft notion. I spotted these cute love themed ribbons and since sue does multiple crafts I thought they would be perfect.


Lastly was the handmade item, this was more challenging deciding what to make. I was all set to make a draw sting project bag/basket, when sue made herself one. I finally opted instead to create my own zip pouch pattern. Fabric choice was the next decision, I posted a couple of fabric options on ig and was very happy when sue commented her favourite. 
It was a nice pouch to make and after a few suggestions to make it in to a pattern, I am now in the process of doing so! I’m so excited but more on that in the next few months.

Now to share what I received from the lovely @michellehollyoak


I was sent some malteser buttons, a pen and little heart shaped paper clips, some Riley Blake fabric and a needle felting kit. She also made a lavender filled heart (with her home grown lavender) and a crochet market tote. A hexie coaster was also sent as a little extra.  I love all my gifts and am especially excited to try the needle felting. This swap made me feel very spoilt this Valentine’s Day.
Mx