Showing posts with label fabric. Show all posts

Saturday, 1 October 2022

hair bow


I saw this cute hair bow idea on pinterest and decided to make my own. I followed a tutorial and found the shape bulky in the centre, so I decided to change the pattern and make my own to share with you. I have photographed the three main stages below and you can see the end result, once tied, above. At the bottom of this post is a printable instruction sheet including the template to make your own.


Mx

Tuesday, 14 July 2020

My rainbow jelly quilt!


I saw this rainbow jelly roll quilt pattern, designed by ruby star society, on Instagram. Ruby star society hosted a quilt along and I was so desperate to take part. Unfortunately I had too many projects started already, but I couldn’t resist any longer, especially since it is a free download from the moda fabrics website here

Technically I didn’t use a jelly roll at all, which would have made it so much easier. Instead I stuck with my 100 days using cotton and steel project and used some of my stashed cotton and steel prints. My sister helped me raid my stash and find the fabrics that were long enough. We then put them into block combinations with little ombré colour groups and cut the strips to size. It took a while to cut out but it was worth the extra effort. I also made more work for myself by making 2 extra blocks (20 more stripes) to make the finished quilt longer. Luckily, I wasn’t too difficult to piece together although the blocks are quite large and I wish my quilting ruler was longer for the sub cutting! I'm pleased I made it bigger though as it definitely makes it a more useable size for us as a family. 


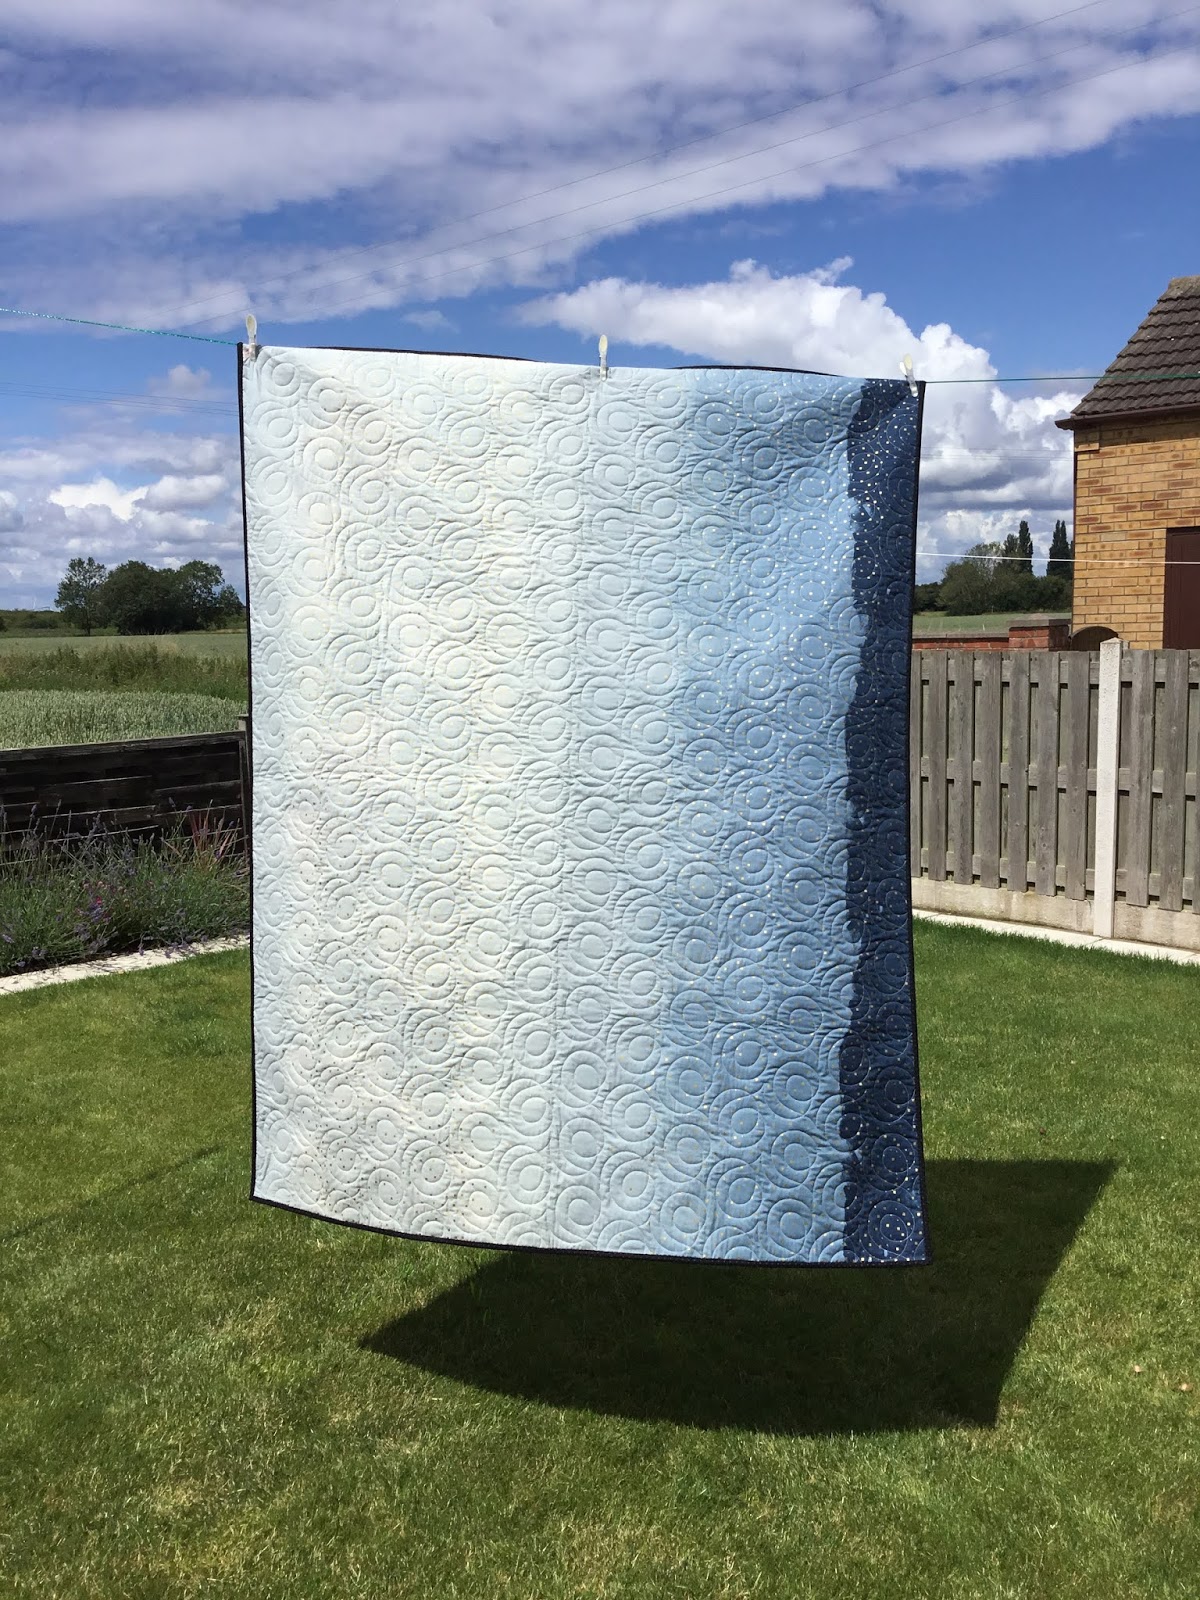
We had a nice bit of sunshine when I finished the top so I managed to get photo in the garden before it was sent away to be quilted. I sent it away to Cath at Cumbria long arm quilting for some of her magic. Although the quilt wasn't huge, I didn't really fancy quilting it myself and I love the swirl design we picked for the quilting. The swirls are much more decorative than I could do and think they work lovely with the patchwork. Cath attached the binding to the front and I sat with a few films to hand stitch the binding to the back. 


I am so pleased with my final quilt and it is on the sofa with my catty corner quilt, looking great together!

Mx

Saturday, 14 March 2020

Birthday stitchers swap 2020... what i made!!


I decided to take part in the birthday stitchers swap on Instagram again this year. I was so pleased to be making for one of my close friends again too! I had so much to choose from the inspiration mosaic Zena made, it was full of fun ideas and I was quickly excited to get started. 


For the main make I chose to make a quilted tote bag with strawberry patchwork. I used similar construction to the previous one I had made, but changed the measurements (I'm hoping to do a tutorial blog for this soon!). I knew Zena had already received a larger grey tote, so it would be nice to make something different and a bit smaller. The smaller size also made more sense to fit the size of the patchwork strawberry


To make the bag I used red and green scraps for the strawberry patchwork and Everglades by Betsy silver for Michael Miller for the white. I added an Essex linen in ‘midnight’ to finish the bag outer nicely. For the lining, I used Strawberry tea by Axelle design for Michael Miller and added a slip pocket inside. This print felt like the perfect match for the patchwork design on the outer. I picked the Aurifil thread in shades 2745 & 2021 to use as I thought the colour matches were great


For the small makes, I started with a medium sized sewing case as Zena had included a few similar ones on her mosaic. I didn't want to purchase another sewing pattern, so I just made it up as I went along. I'm pleased with how it turned out, (although I'm sure there was a lot easier way to make it, so I wont go into that!) 


The main feature of this make for me though was the EPP. I didn't want to do just regular hexie shapes, but I don't feel quite ready for anything as fancy as clam shells. I decided a honeycomb was a nice option, it was a little different but still in my comfort zone. It also worked very well with the fussy cut images that I wanted to include. I felt it would be too much to make the entire case from patchwork, so I opted for a panel on each side instead. I joined my EPP shapes together, appliqued them onto the linen, then quilted over the top. This was the first time doing something like that and I'm so happy with how it looks. I used several prints from the Penny Rose fabrics 'bunnies & blossoms' by Lauren Nash range, some cream/ natural linen (I cant remember the shade colour) and Aurifil thread '2311'. I know Zena likes to add extra details into her makes, so I thought it was only right I did the same when making for her too. I made zip charms using some strawberry shaped beads and handmade hearts. I also used a single honeycomb shaped piece of fabric, appliqued on to the inside with stuffing in, to create a mini pin cushion!


Next was a small drawstring pouch with a pocket on the front. To make it, I used some cotton + steel fabrics. Zena said she likes neon's and I knew I had some prints that I had bought without a plan of what project to make with them. This seemed like the perfect opportunity to use them. I liked using the different prints but felt like they blended a bit to much, so I went in search for some trim and ribbon. The neon was a struggle to find and it isn't a perfect match, but it's close enough to make the pocket look pretty and fasten the pouch.


The last little make was one of my mini travel pinnies.  I used the Riley Blake 'little sweetness' range by Tasha Noel, which I know Zena loves and managed to fussy cut the little dresses for the front to really make a feature of the print. The extras that I bought for Zena was a Cath Kidston mug, a 'z' candle and some charms. The best gift wrapping for any sewist is fabric of course, tied with a big ribbon. I also made a little scrappy keyring that served as a gift tag! 


It was a pleasure making everything and I'm pleased to say Zena loves her gifts. More photos of her gifts are on my @craftylilmouse Instagram account and you can go see all the beautiful things Zena makes on her account @mycreativepottylife too!
As for my birthday stitchers swap parcel, I still have a while to wait. I am already getting excited and will share those as soon as they arrive...

These projects were on my finish-a-long list, so I can tick them as complete!!

Mx


Sunday, 1 March 2020

mini travel pinnie


Last year I took part in an Instagram sew along called #teenytinypinnieparade and created this special pincushion.
It has magnets inside to be able to attach to clothes or car seat belts for travelling. With features including a puff for pins and needles, plus space to attach binding clips to the side it is just perfect for me.


It worked out so well, I  made a few as little thankyou gifts. I then decided I liked it so much, others might too, so I would make it into a pattern. 


It is available (as an instant digital download) on my etsy store if you fancy making one too!

Mx
 

Saturday, 7 December 2019

Sally’s choose and sew supply case...

 
One of the gifts I choose to make for Sally (my birthday stitchers partner) was a choose and sew supply case. She had suggested needing a sewing case for her EPP supplies. When she made herself the case I was planning on, I decided to make my own pattern.
 

I had already started planning the supply case, but thought Sally would prefer different options to me. We are good friends on instagram, so without giving it away that I was making for her, I asked what she’d prefer. I planned and worked out measurements. Next was fabric choice, cotton and steel was an obvious choice. I picked some patterns and colours I thought Sally would like, but wasn’t convinced by any for the outer of the case. I decided I’d join the #100hexies100days challenge on instagram and join them together for a cute fussy cut panel. Since I was making a large case, it took more than 100 and I was quite a long while hand stitching, but I’m so pleased I did now. 


For the inside of Sally’s supply case I decided to make a vinyl workspace with 2 pockets and a piece of felt, then a zip vinyl pocket at the back for storage. I did the binding with a flap closure construction method on this case. Of course, I made one of the snap in pouches and have sent the measurements to Sally for her to be able to make as many more as she wants. 
 
 
I also made some beaded zip pulls to finish it nicely. I really hope Sally likes her choose and sew supply case and finds it useful.
 

The pattern for the choose and supply case is now available in my Etsy store. It is a large pattern with 2 sizes and has lots of pocket options and 2 construction methods. It means you can make tons of different combinations, so that you can make the perfect case for you and maybe even one for a friend!


This project was also one of my finish a long projects, you can read  more of my list here.

Mx

Tuesday, 3 December 2019

Dashwood advent

After making a stocking last year for a friends little girl, I decided an advent calendar would be perfect for this Christmas. I picked out the dashwood studio panel, with a very cute illustration, and little pockets for chocolate coins.
 
 
After I’d cut out the pockets, I decided to wundaweb all of the sides down to help stop it fraying with use. I top stitched across all of the top edges and then stitched all the pockets on to the panel.
I cut a piece of backing and wadding to the same size as the advent panel. I also cut out 4 rectangles of backing fabric to create hanging loops. With these, I stitched 2 pieces of backing fabric wst, then turned it out and repeated to create 2. I topstitched the two pieces in place to the upper section of the backing, leaving a gap between them. I then stitched the advent rst to the backing and wadding pieces, trimmed some wadding from the seam allowance and turned out. I stitched up the turning gap and added some top stitching/quilting to the advent to hold the layers together. I cut a piece of dowel to size and threaded it through the tubes. I then ladder stitched both outer ends closed to stop it falling out. The gap in the middle means you can just hang it up or add a ribbon if you need too. 

 
This is one of my finishalong projects, you can check out the rest of my list here.

Mx

Monday, 2 December 2019

Choose and sew supply case

It's release day for my latest pattern and I’m so excited, I thought I’d share a little more about how and why I designed this choose and sew supply case.
At the beginning of the year, I started an EPP quilt. I knew it would take me a long time to sew and would mainly to sewing while traveling, so of course, it needed its own pouch. I picked the 2 in 1 designed by aneela honey and it’s a great pouch but unfortunately not for this. It wasn’t long before I was getting frustrated with it and decided to design my own!

 
The main problem is that there isn’t anywhere to put the pieces your working on, other than on top of the vinyl pockets. This was fine until I was sewing in the car and my fabric and papers ended up going down the side of the car seat. I knew I needed somewhere to tuck my pieces safely whilst still having easy access to them when sewing.
The second thing was, since all my tools was in the same pocket, I was constantly in and out for my scissors. They would get lost amongst the other tools, plus I couldn’t leave the pocket open for easy access since everything would fall out.
This workspace section of my new pouch was the solution I came up with...

 
The next problem I encountered was when I started putting my pieces together. Once sewn together, they no longer fit in my pouch. This was ok if I was at home but, when out I didn’t want to spoil them. Since I didn’t have anywhere to put them, it meant taking another pouch. I decided one large pocket was the solution on the other side of my new pouch...


Next was some storage to take my fabric and papers with me. I thought a simple pouch would be just fine. Then I thought about it a bit more and remembered how annoying it is when you fancy something else for a change. I’d either have to take all of my quilt pieces out or find a different pouch for the new project and have to move all of my tools. I came up with the idea of a removable pouch. This way I could keep my tools in the case but make multiple pouches to store different projects. Even better they just snap in or out whenever I fancy a change. This one was a tester, adding kam snaps to a premade zipper pouch...


For the outside, I chose to make a patchwork panel with a mix of cotton & steel prints around this fab sloth scrap I had. I finished this one with some pink binding to tie in with the inside and an open ended zip fastening. To make it portable, the whole case folds neatly in half with all the supplies inside.


If you like this idea, I have written it up into a new pattern so you can make your own. Not happy with just one version though, (since one pouch isn’t for everyone) I have made several options within the pattern. It actually includes 4 workspace pocket options, 3 large storage pocket options, 2 construction methods, in 2 sizes and I even added optional handles to make your supply case more portable! You choose how you would like your workspace and storage, from the different pocket variations and fastenings and follow the instructions to sew up a case and snap in pouches to suit your needs... Hence why I decided to call it the 'choose and sew supply case'. I hope it gives you plenty of choice and I can't wait to see everyone’s different versions!
The pattern is available in my Etsy store here...
 

Mx

Sunday, 1 December 2019

sweet seaside bunting...


As part of my birthday stitchers swap parcel, I made my partner some bunting. Sally had suggested she’d like some bunting, however, it wasn’t really clear from her inspiration board what style she would prefer. Knowing Sally’s fabric tastes and because I wanted it to feel fresh and summery, I chose the Tasha Noel seaside fabric range first.
I think bunting is always better double sided, so I chose the Tasha Noel a small floral design from the a little sweetness range to compliment it. Making it reversible also gave her an alternative look in case she didn’t like the seaside theme. Since I learnt Sally’s favourite colour is red, and it matched my fabric choices perfectly, I picked out a red lace edge binding for the top of the bunting.
I first fussy cut some of the seaside characters, then added the other fabrics in between from the range until I was happy with the layout. I cut the same amount of florals and interfacing. I’m not quite sure why I interface bunting, I just like the way it looks. I stitched it all together and then tried to get a photo of it all, which turned out to be quite tricky.
I never know how many pennants to make when sending bunting, this might be a lot but hopefully she will find somewhere to hang it all!
This is one of my finish-a-long projects, although finished in Q2 I think... it wasn’t gifted until October so I’m including it in my Q4 finishes. You can see my finish-a-long list here.
Mx

Friday, 15 November 2019

star cushion


If you saw an earlier blog post this year, you might remember I took part in a birthday swap on Instagram. I had quite a while to wait for my partners birthday though. I was given the lovely Sally aka @chasing.tigers on Instagram, to make for. I was both thrilled because she has become a close friend online, but also anxious since she is such a talented maker herself.


Anyway, I chose to make this cute fussy cut cushion as her main gift. The cushion design was featured on her inspiration board, and with a bit of quilty maths, I worked out the measurements to make it. I was struggling to find coloured fussy cuts in my stash, so did a bit of fabric swapping to get enough. I also purchased this cotton and steel tiger fabric, as I just knew it was the perfect centre to personalise the cushion. Both me and Sally had purchased this low volume fabric, so I was pretty confident she would like it.
 
 
After my meadowland quilt experience I hate flying geese, so why I chose to do this cushion with 16  geese, I do not know! I wasn’t looking forward to sewing them, however, they went surprisingly well. I did simple straight line quilting 1/2” apart and made one of my concealed zip backs(tutorial for that here). Once I had sewn my cushion together, I added top stitching to the edges. I think this gives a nice finish to the cushion without the need to add binding.
 
 
The entire thing came together quite quickly and I love how it turned out. Thankfully my partner has received her gift now and loves it!
 
This is one of my finish-a-long projects. Even though this was technically made it in Q3, I hadn’t yet gifted it to be able to share so I am including it for Q4 instead. Read about my list here.

Mx

Saturday, 2 November 2019

My Christmas stocking


For a few years I have seen a Christmas stocking sew along on instagram. It is hosted my @sunnydaysupply and all the stockings they feature are fabulous... I just had to make my own!
I was going to join in last year, I even started, the plan for my patchwork soon changed though and that patchwork turned into a cushion that was gifted to a friend.
Fast forward to this year and although I had too many projects already, I started my stocking again. This time I wanted to try something different and just have some fun sewing. I decided I would use the scraps I had left from cutting out a quilt. It is some heather Ross sugarplum fabrics, with cute mice! I then chose to patchwork using the quilt as you go method. I have seen it lots on instagram but not found the right project to actually try it... til now.

It was so much fun to just add pieces and quilt, although I did consider fabric placement a little. I did end up with a white patch on one side, but I still think it looks ok especially since its only the one side. I wasn't planning to do both sides, but I was enjoying sewing and had scraps left, so I figured why not?


I finished quilting both sides of my stocking and trimmed to the same size. I cut out the matching check lining, which was a big  piece left over from the same quilt.
Once I had sewn it all together, I still felt like it was missing something. I decided I'd add a pom pom trim... I have kept buying them without a project and they seemed like the perfect finishing touch for this. As it was my first time sewing pom poms, I went for a simple straight top stitch in the middle of the band. I did have to change to a zipper foot on my machine to get past the pom poms. Part of me wishes I had taken the time to hand stitch them in place, however, I think it looks neat enough to be happy as they are.

This was a lot of first times and I am so pleased with how it has come together.

If you want to see more great stocking inspiration, visit the #sunnystockingsal on instagram.

Mx

Wednesday, 23 October 2019

escape and create christmas

I saw a post on Instagram asking for bloggers to join Escape and Create and thought it was a great opportunity. I applied, but wasn’t expecting to hear from them. It was to my surprise that they replied to say I was one of the chosen sewers. I am so thrilled to be part of the team. I have just got my first blog post finished and published with them... I am so excited I figured I’d share it here too!!

 
I love Christmas and thought it was a good excuse to make a reversible Christmas patchwork table runner, placemats and coasters. I wrote the blog to include full 'how to' instructions, with extra information like how much fabric to order and a handy cutting diagram to get the most from your fabric.
Since this made it quite a long blog post, I choose to remove the binding instructions, as readers who are already quilters will know how to sew binding anyway. The project is also suitable for beginners though, so I have shared the tutorial on binding on a separate blog post here. This one goes through the method I used on this project, but I also plan on sharing an alternative binding tutorial later so keep your eyes peeled for that coming up.
 
 
So, if you fancy looking at this project in more detail, want instructions to make your own or just fancy a read... go check it out on the Escape and Create page here. You can also find a great choice of fabrics and patterns on their website too, so I'd recommend a look.
 
This project was also included in my Q4 finish-a-long, so I can tick it off as complete and you can see my list here.
 
Mx

Sunday, 7 July 2019

Snappy zip pouch


So I have now released my first pattern! It’s called the snappy zip pouch and I thought I’d tell you all about it!
It all started with the gift I made for the #send a little love swap I took part in January/February. I decided to create this double sided pouch. One side has a zip and the other a snap fastening (or in this case 2)
I was very happy when the recipient loved it and I got many compliments. A couple of people asked if I’d be making a pattern because they would like to make one too. I wasn’t sure at first but then thought why not... it wasn’t the easiest to do though. I tend to make little scribbles as I sew when I’m making it up as I go, sometimes I can’t even understand them and definitely not enough to write instructions! 
I decided I’d start again, worked out the measurements and take pictures as I sew. Then came the written instructions, for this I talked my sister into helping. She is loads better at English but only a beginner at sewing, so explaining everything wasn’t the easiest. We thought we had done alright but wasn’t quite happy with our first attempt. I sent it to a couple of people to pattern test for me and give some feedback. Then came the stress of making amendments, a few diagrams and deciding the pictures weren’t quite right. I ended up making another pouch to show everything clearly and I am so glad I did. Then it went off to the pattern testers again, plus an extra as a fresh set of eyes.
During this time I also made a couple more and changed the sizes and made a few alterations. My sister was not pleased when I asked to add more to the pattern, but as a consumer I always love bonus sizes so thought it could only be a good thing. 
I’m so happy with how it turned out and the pdf download is now available in my Etsy store. I feel nervous about the whole selling thing but also I’m so excited to see everyone’s pouches. 
Would I do it again... part of me thinks no. It’s a lot of effort and I found it quite stressful, however... maybe, yes. I have another pouch I’m desperate to make myself but feel it could also be a nice pattern to share. I think we learnt a lot and it might be easier the second time, so we shall see...watch this space!
If you want to make your own #snappyzippouch visit my Etsy here to buy the pattern!
This whole experience was part of my finish-a-long project list for this quarter. You can read more about my projects here. It is almost time for Q3 so if you fancy joining too, visit their blog here.
Mx


Sunday, 9 June 2019

zipped cushion tutorial

Since I'm running a cushion swap over on Instagram, I thought I would share a quick tutorial on how I like to make a nice neat zipped cushion back.
 
 
Start with a zip longer than your cushion width. Cut a piece of fabric approximately 2" high by the width of the cushion for the bottom of the back. Lay your zipper teeth down onto the right side of the fabric strip and pin in place, so the zipper tape lines up with the top edge of the fabric. stitch along the edge using your zipper foot on your machine to help. Fold the fabric back, press and top-stitch along the edge of the zip. For the larger top section, cut your fabric to size across the width, but add extra (approximately 2")to the height to cover the zip. Lay the zip teeth down onto the right side of your other cushion back, so the tape aligns with the fabric edge. Pin and sew.


Now at each end of the zip, you are going to sew an 'L' shape to stop the zipper and create the concealed fold. With your fabrics still right sides together and the zipper in the centre with the pull in the middle, mark out up to 2" in on the width along the zip and up to 1" down (or the width of the zip tape). Do this at both ends of the zip, and then sew along your marks, ensuring you run across the zipper teeth a few times to make it extra secure. Now fold back your fabric and press carefully over the zip. Next, top stitch along the other side of the zip through the fabric flap, lining up along the zipper teeth to hold the layers in place. Then, trim off the tape in line with the fabric edge and snip down either side of the tape carefully to avoid the fabric. then cut across to remove the teeth from the L shape sections to reduce bulk on the seams. Make sure your cushion back is the right size and square.
 

 To join the back to the front, you first need to decide if you are binding the cushion or not. Above shows a cushion ready to be bound, with the front and back pieces simply aligned wrong sides together and a stitched line around the edge, less than a 1/4" from the edge to hold the layers in place. You can then trim the sides neatly and sew on the binding of choice to finish, covering the joining stitching around the edge. If you don't want to add binding, place your front and back right sides together, with the zipper open and stitch all the way around using a 1/4" seam allowance. Turn the cushion through the gap in the open zipper and press. For a nice alternative to binding or piping, you can topstitch around the edges around 1/4" in on the turned through and pressed cushion.


Mx