Showing posts with label boxed corners. Show all posts

Tuesday, 31 December 2019

Glam bag

I made this bag as part of a Christmas gift for a friend. She's a beautician so when I saw these fabrics, I knew they would be perfect for her bag. I mixed prints from the 'Kiss me, Kate' range by See Kate Sew for Riley Blake and 'Glam Girls' by American Dream House for Michael Miller.
 

I designed the panels to mix the fabrics and spread the colours. I then worked out the quilty maths and cut my pieces as follows:
 
lips: 15 1/2" x 3 1/2"  +  14 1/2" x 3 1/2"
xox: 3 1/2" x 4 1/2"  +  3 1/2" x 4 1/2"
bows: 9 1/2"x 2 1/2"  +  3 1/2" x 5 1/2"
lipsticks: 6 1/2" x 6 1/2"  +  6 1/2" x 4 1/2"
eyelashes: 9 1/2" x 4 1/2"  +  3 1/2" x 4 1/2"
stripe: 6 1/2" x 4 1/2"  +  6 1/2" x 5 1/2"
 
The panel was made using the quilt as you go method with 1/4" quilting and seam allowances. I then added the sequin print to the top and base with 1/2" quilting. I created the handles with the same sequin fabric, with interfacing for strength and batting for comfort.  
 
 
I boxed the corners on the base and lined with the bows fabric to finish. I also added a little handmade label into the side seam.
 
 
I'm pretty pleased with how the bag turned out and think it's a useful size... Thankfully my friend is also pleased with it!! This is one of my finish-a-long projects which you can find here.
 
Mx

Monday, 7 January 2019

my #sew6organizers sewalong


This year I decided to host a sewalong on instagram, with the help of a friend zena. We chose to do 6 projects each from the Aneela Hoey stitched sewing organizers book, one per month. Everyone who joined in could choose their own patterns and make any little adjustments to the projects to suit them. The idea was to share our projects and we had a little group chat for any questions or help, making the most of the lovely sewing community on Instagram.
These are the six projects I made for the sewalong: I used the distant dreams collection from dashwood studios. I split the collection into 3 mini collections and added some dashwood twist fabric, (indigo and cherry I think).

 
I kept the first project simple with a little fold up pouch. This is a great little project that doesn't require a zip. It is an simple pattern to follow and can easily be adjusted to make other sizes.
The second project was this handy needle book. I liked this pattern, although I did make a few changes to the suggested pockets used in the pattern. In the book it shows 2 different sized pockets at the back, at the front is a single pocket with the addition of a small pin cushion. I changed the back to just have the 1 large pocket and since I didn't need a pin cushion, I chose to just do one large pocket at that side too. These work out perfectly to hold all the needles I keep in packets.


The next project was the see-it-all pouch... this is a very useful pouch and quite simple construction although the use of binding does make it slightly harder. I used sparkle vinyl as I liked the look and fussy cut the back to ensure I had a full peacock in the centre.
The fourth project was the 2-in-1 case. I love this case and I am using it to hold all my tools. This is made in a similar way to the see-it-all with the addition of a fastening tab. I had a few options for fastenings; I did try a button first but the button hole on my singer machine was not very neat and I was struggling with placement, I also considered using a magnetic clasp, but decided against this option as they are very strong and I didn't want my tools attracting to the magnets. The best solution I found worked as a fastening was a kam snap, both simple to fit and to use.  

 
Next was the fold up sewing folio. I found this project slightly tricky, not because of construction but directions. I kept getting very confused about the direction of things, so my layout differs slightly from the one pictured in the book. It is still fuctional though and my mum has taken it to store her sewing supplies.
 
The final project was the boxy pocket pouch, I like this pouch and it is definitely bigger than I expected it to be. Since it was the last project and I had been avoiding it slightly (I'm not sure why, maybe because I didn't want the sewalong to end) to give me a little nudge, I added this to my  finish-a-long list of things to make. You can read more about that here!
 
Overall, I enjoyed hosting the sew along and would definitely do another one. It was a joy to see everyone else's projects and make some friends along the way too. If you're interested in seeing all the projects for yourself, you can visit the #sew6organizers on instagram.
Mx

Saturday, 21 October 2017

go large!!

 
For this variation on the basic boxed bag (instructions here), I have made the bag much larger, quilted the fabric and added handles to be used as a knitting bag. To make it, I scaled up the pattern as follows:
  • the main body: 2x outer fabric, 2x batting & 2x lining measuring 12" x 24" with 3" square cutaways (for the boxed corners) 
  • handles:  2x outer fabric measuring 25" x 3 1/2" & batting measuring 24 1/2" x 1"
  • 18" zip

First, I roughly cut the outer fabric and batting to size, allowing extra for the quilting. I then quilted the outer fabric and batting using straight rows of stitching. Once quilted, I cut out the pattern pieces and began to assemble, treating the quilted pieces the same as I would usually treat outer fabric. For the handles, I cut an extra 2 lengths of batting and 2 strips of fabric to create quilted grab handles. If you prefer, you could use webbing or other construction methods to make the handles, (see more information here). Before the outer fabric and lining pieces were joined together, I machine stitched the handles in position on the outer fabric. This ensures the stitching isn't seen on the inside, keeping the finish as neat as possible. This style of bag, (simply enlarged with handles, but without quilting the fabric) would also work well for a swimming or gym bag, especially if you used a shower curtain or water resistant lining.


Mx

Saturday, 2 September 2017

boxed bag for the boys !!

 
I made this simple wash bag as a gift for a male friend. This is a variation on the bag in the last step by step tutorial, showing how fabric choice can change the look. I used thick upholstery fabric with a jeans print for the outer, to give it stiffness which helps hold the shape without the need for interfacing. I used a shower curtain to make the lining water resistant, so it's perfect for use as a wash bag.


Mx

Saturday, 12 August 2017

Basic boxed bag...

Continuing the theme of zipper pouches, I decided to return to the boxed corners with this step by step guide on how to make a fully boxed, lined pouch/bag. This makes a neat but roomy bag, perfect for cosmetics or stationary!

 
To start, back your lining fabric with some medium weight iron on interfacing to give it structure and help hold the boxed shape. Then, cut the following:
  • 2 x outer fabric measuring 7 1/2" x 10 1/2" 
  • 2 x lining fabric measuring 7 1/2" x 10 1/2"
  • 1 x cardboard square template measuring 1 1/2"
You will also need a 8" zip and cotton to colour match the fabric. The handmade label is an optional extra I like to add into all my sewing projects. A short length of coordinating ribbon to use as a zip pull is another optional extra finishing touch which can look nice.
 
Using your square template, trace around each of the corners of all 4 fabric pieces. Cut the squares of fabric off and discard. 
 
Make a sandwich with the lining right side up, zipper tape teeth facing up and outer fabric right side down. Pin and sew using 1/4" seam allowance with the zipper foot on your machine. Fold the fabric back away from the zip and create another sandwich to attach the other side. 
 
Lay out flat and press. Top stitch along the edges of the zip for a neat finish. Part open the zip to allow for turning through.
 
Now turn so the outer fabrics are right sides together and the linings are right sides together. Pin around the edges, leaving the cutaway corners and a gap in the base of the lining. Add your handmade label into the side seam of the lining if you are including one.

Sew around the edges using the 1/4" seam allowance, ensuring you do a locking stitch at either end of every length of stitching, (putting the machine into reverse to create a short length of tripled up stitches to hold everything in place). 


To shape the boxed corners, open the fabric out where you have a gap in the stitching and pinch the seams together to create a flat edge. Try to ensure the side and base seams align before pinning and sewing.
 
 
For the corners near the zip at the top of the pouch, you need to pinch both the lining and outer fabric corners together. I find it easiest to pinch the corner of one fabric and ensure this is lined up, then still gripping this, pinch in the other side and bring this into line. It can be a little more tricky to ensure all the layers are aligned with each other and central to the zipper tape. Once all of the corners are pinned, sew on the machine using the same 1/4" seam allowance. You may wish to reverse stitch over the zip when sewing the top corners to reinforce the ends of the zip. 
 
Turn through to double check everything is OK on the right side before turning back through. Cut away the excess from the ends of the zipper, (using old scissors so you don't blunt nice fabric ones!) You might also want to go back around the seam allowance inside using pinking shears, zigzag stitching or an overlocker, to prevent fraying and remove excess bulk. 
 
Turn back through and slip stitch the gap in the lining before pushing this into the pouch. Give it a final press, loop the ribbon through the zip pull, knot and trim the ends to complete the pouch.

Don't forget to save your scraps... all of those little squares cut from the corners can be used in little patchwork projects and mini makes!!
 
Mx 

Sunday, 16 April 2017

square cornered pouch...


For this step by step, I wanted to show you another way to box your corners. I have also included a neat way to finish a zip, with coordinating fabric tabs which give you square corners. The outer fabric for this pouch is simply calico which has a screen printed design on one side.

Begin by cutting your fabric as follows: 
  • 2 x outer fabric to measure 13 1/2" base length x 8 1/2 height, angled in to 9 1/2" across the top.
  • 2 x lining fabric to measure 13 1/2" base length x 8 1/2 height, angled in to 9 1/2" across the top. 
  • 2 x outer fabric to measure 1" x 2" (for zipper tabs)
  • You will also need coordinating cotton, a zip measuring 8" and a handmade label if you would like to include one.
To cut the shaping of the main fabric pieces, cut rectangles measuring 13 1/2" x 8 1/2". Then, mark the top (long) edge of the fabric 2" in from the end and draw a line down from this point to the bottom corner on each side. Cut away these triangle pieces to leave the pieces needed for the bag. 

 Press each of the tabs in half, then fold the ends into the centre fold and press again. Then, place the end of the zip between the folded edges, down to the centre fold of fabric. Wonder clip or pin and sew across the zip to secure the fabric tab in place. Repeat for the other end of the zip, so both ends are enclosed in your outer fabric.
Centralise the zip on the right side of the outer fabric, zip facing down, and layer a lining fabric piece on top right side down. Ensure the top edge of all three pieces line up, before pinning and sewing using a zipper foot on your machine.
 Fold the fabric so the right sides are facing out and the zip is visible. Press, then top stitch along the edge of the zip to create a neat finish.  
 Repeat for the other side, to attach the outer and lining fabrics to the zip, press and top stitch.
 Now, open the zip wide enough to turn the project through. Then, fold the project so the outer fabrics are right sides together and the lining fabrics are right sides together. Ensure the zip is laying towards the lining. Pin around the edge, securing in your handmade label between the lining fabrics. Make sure you leave a gap in the lining for turning through.
 Sew around the edge, then overlock the edges to prevent fraying if possible, (if not, you can use a zig-zag stitch on your machine, sewing within the seam allowance.)  
 Make sure you still leave a gap in the lining for turning through!!
 Now onto shaping the corners. You will need to pinch the base and side seams together, ensuring the seams line through. You can check by pinching the corner, then poking it through the hole in the lining to have a look (as i have in the picture above). Put a pin in along the seam to hold in place.
 Measure 1 1/2 " from the corner down the seam and mark.
 Draw a line across the seam making sure it is level.
 Sew along the line, reversing at either end to secure it.
Overlock across the corner, just to the outside of the stitched line. If you don't have a overlocker, you will need to zig-zag stitch and then cut the corner off. The corner piece can be discarded. Repeat for the other three corners, so the outer fabric and linings all have squared corners.
 Press, then turn through. Your corners should all be boxed with a neatly lined up cross section as seen in this photo.
 With the hole in the lining, you can either slip stitch it closed by hand or sew it with your machine. The machine is a faster and stronger method, but it does leave a small line of stitching visible inside the bag. To do it, you need to fold the raw edges in, matching the depth of the seam allowance for a smooth edge. Pin along the gap to hold in place.

 Simply sew along with your machine to close the hole. Then, push the lining inside the bag and give it a final press.


Mx

Saturday, 11 March 2017

2 colour boxed zipper pouch


Following on from the boxed base zipper pouch, I created a 2 colour variation. This involves an extra stage of joining fabrics together to create a different look. For the one shown here, I have used two Michael Miller cotton printed fabrics - 'pineapple palm' and 'migration', with shower curtain fabric for lining. For this particular pouch, I also scaled up my original pattern to be used as a wash bag which will fit an average full size shower gel in. For this size, you will need a 12" zip to coordinate with your chosen fabrics.

To begin, cut rectangles from each of your fabrics following the dimensions below. Be aware, if your fabric has a directional pattern, the long edge will be the length of the bag.
  • 2 x fabric A (pineapples) measuring 5 1/2" x 11 1/2"
  • 2 x fabric B (chevron) measuring 4" x 11 1/2"
  • 2 x lining (shower curtain with interfacing bonded prior to cutting) measuring 9" x 11 1/2"
Now, you need to join your outer fabrics together to create 2 side panels. Pin fabric A to fabric B right sides together, along the longest edge, (if using directional fabric, make sure that you are pinning the bottom edge of fabric A to the top edge of fabric B). Sew along the seam using a 1/4" seam allowance. Open out the fabric and press the seam down towards fabric B. Top stitch to ensure the seam is laying flat and secured in place for a professional looking finish. Repeat with the other fabric A and B pieces. Then, take each of the outer fabrics (fabric A & B) and the lining pieces and trim into a 'T' shape by cutting a 1 1/2" square from both bottom corners on the long edge (see diagram below).
 Once you have reached this stage, you can treat your joined pattern pieces as you would the single pieces of outer fabric on the original pattern found here. Simply follow these step by step instructions to construct the pouch. Just take extra care to match up the joining seams between the two fabrics when sewing the outer pieces together.


As always, you can adjust the dimensions of the pattern to create your own version. You can also play around with different fabric choices as this design works well with combinations of patterned, plain or even varied textures of fabrics, such as a faux leather base and cotton top ... it's up to you! Have fun making and please share the results, you can tag me in your photos on instagram @craftylilmouse or comment below with link to your pictures.
Mx

Saturday, 25 February 2017

Boxed base zipper pouch ...


Following on from last months step by step pouch project, I thought I would show you how to make a pouch with a boxed base. With just a few more steps than a basic zipper pouch, this is a great way to create a pouch with a little more room inside. I have used a colourful printed cotton for the outer fabric and sections of a fabric shower curtain for a waterproof lining, perfect for a wash bag or cosmetics pouch.

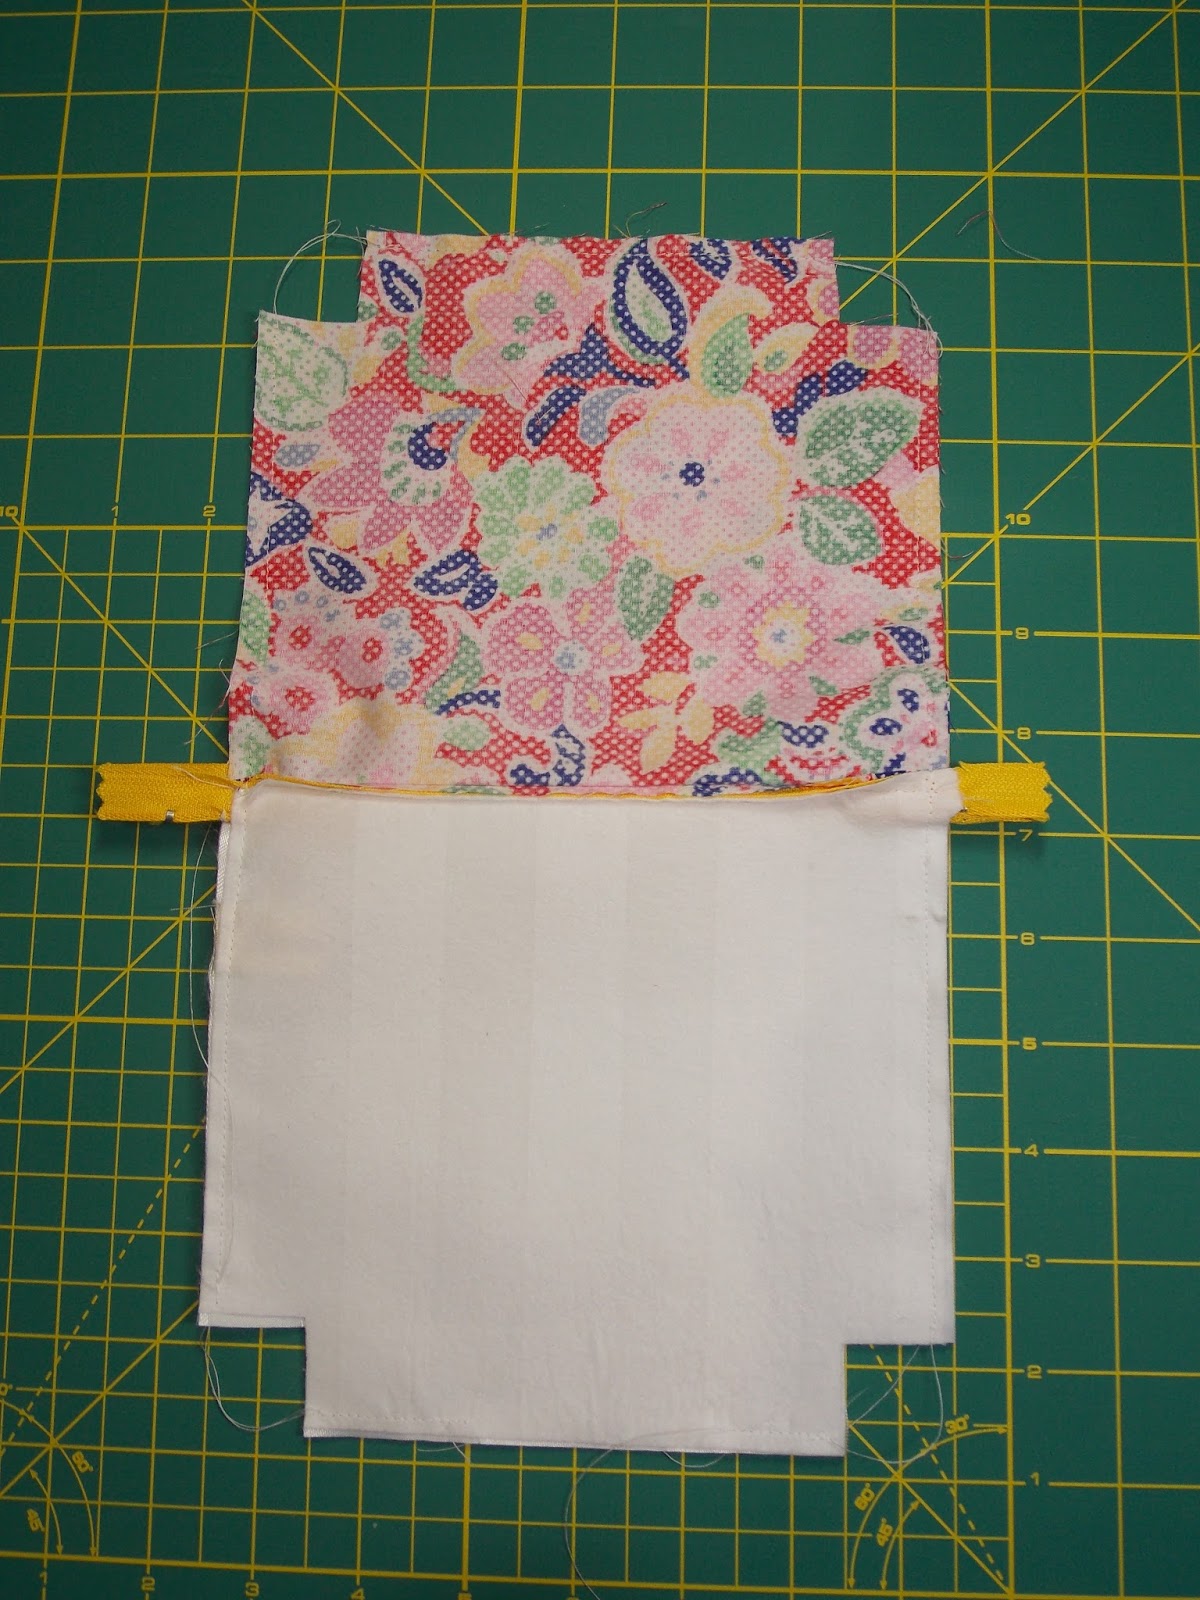
Cut your 2 x fabric and 2 x lining pieces to 7 x 6 1/2 " rectangles. You will also need a zip at least 8" long and coordinating cotton. As an optional extra, I cut a piece of ribbon to create a 'handmade' tag for inside. Once you have your rectangles of fabric, cut away a 1" square from each of the bottom corners, (see image above).


You can now begin construction. Start by layering the zip between the right sides of a lining piece and an outer fabric, ensuring the top edges line up before pinning and sewing.

Once sewn, press and turn so right sides face outwards then top stitch along the zip edge for a neat finish.


Now repeat for the other side layering the other half of the zip between the right sides of the lining and outer fabric. Don't forget to press and top stitch.
Open up the zip to enable turning through, then pin around the edges with lining to lining and outer fabric to outer fabric, right sides together. Make sure your zip is held down towards the lining. If adding a tag, now is the time to pin in place so it will become trapped in the side seam of your lining.


You now need to sew around the edges of the rectangle making sure you leave a gap in the base for turning through and do not sew the square corner cut-outs... the corners are sewn afterwards to create the boxed shape! Press and trim any excess from the ends of the zip.


Next, shape the boxed corners by opening the fabric out where you have a gap in the stitching, then pinching the seams together to create a flat edge, (see above image). Try to ensure the side and base seams align before pinning and sewing.


 You will need to sew each of the 4 corners, then press by folding the base down flat and running the iron along (see outer fabric in image).


Turn through and slip stitch the gap in the lining before giving it a final press. You now have one completed boxed base zipper pouch. As always, you can play with the starting measurements to create different sized pouches to suit your needs.

Mx