 For this tutorial I wanted to create another variation on the zipper pouch, this time moving the zip part way down the front panel. This is easy to make without a lining, however, I like my pouches to be fully lined for a more professional finish. Adding a lining means this version is a little more tricky than a basic pouch, but I think it is worth it. Follow the step by step instructions below to sew your own...
Add iron on interfacing to the wrong side of the lining fabric (following the instructions on the interfacing). Then, cut 1 x outer fabric and 1 x lining fabric into rectangles of the following measurements:
- 6 1/2" x 7 1/2"
- 5" x 7 1/2"
- 2" x 7 1/2"
You will also need coordinating cotton, an 8" zip, a hand sewing needle and a handmade tag (optional) to complete the pouch.

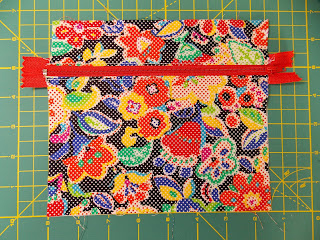
First, take the 2" pieces and create a sandwich, lining right side up, zip with teeth facing up and outer fabric right side down. Line up the top edges of the fabric along the outer edge of the zipper tape and pin in position.
Sew along the edge with a 1/4" seam allowance using the zipper foot on your machine. Fold the fabric back, press and top stitch.
Repeat the sandwich for the other side of the zip to attach the 5" fabric pieces. Lay down the lining right side up, zip with teeth facing up and outer fabric right side down. Make sure everything is lined up along the top edge of the zipper tape, as well as in line with the fabric on the other side of the zip and pin.
Sew with a 1/4" seam allowance. As before, fold the fabric back, press and top stitch.
To prepare the zip, you will need to create a stopper across the end. This is done using a hand sewing needle and thread to tack across the zipper teeth to hold them closed. The tacking won't be visible on the finished pouch, as it is hidden within the seams. Open the zip so the zip pull is not going to be trapped in the seams, but allow a large enough gap to turn through later.
Now to attach the back, fold the lining fabric up towards the zip, so it is out of the way of the outer fabric. Then, place the 6 1/2" outer fabric piece onto the project so right sides are together. Line it up and pin along the bottom edge, then sew across the base with a 1/4" seam allowance.
For the lining fabric, pull the outer fabric out of the way and pin the largest lining fabric piece in place with right sides together. This time sew across the base leaving a gap in the middle for turning through.
At this stage, the project should look like the first image above when opened out. To sew up the top and sides, you now need to fold the lining fabric in to face right sides together and the outer fabric in to face right sides together (second image). If you are adding a handmade label, fold the tab to sit between the lining layers and pin in position with the raw edges facing out so they will be caught in the seams.
You then need to fold the project in, so the sewn base edges line up and the fabric is sandwiched with the zip in the centre and looking like the neat rectangle above. Pin around the sides and top, leaving the base edge.
Sew around the sides and top so that all of the layers are joined together on three sides, (along the base edge, only the linings should be joined to each other and the outer fabrics joined to each other with a gap between). To reinforce the zip, reverse stitch to add extra rows of stitching along either end of the zip when sewing around the edges.
Before turning through, remove excess bulk. Trim away the ends of the zipper and snip the corners, then carefully remove excess fabric within the seam allowance all of the way around the edge. You can either use pinking shears, (as I have here) or an overlocker to do this.
You can now turn through, using the gap in the base of the lining to reach around and through the open zip to pull the layers back out. This is quite tricky so just take it steady and be patient. Once you have the layers the right way round, you can use a bamboo turner to help push the corners into shape. Finally, give it a press and slip stitch the gap in the lining closed. As an extra finishing touch, you can tie on a piece of ribbon around the zip pull.
Mx


