Sunday, 13 February 2022

Dione quilt - pattern testers parade!

Ready for the release of my first quilt pattern, I got some great makers to pattern test for me. I have been a pattern tester quite a few times and really enjoy it. As a pattern writer, the testers are really appreciated too. It means that hopefully there is no mistakes and the pattern is as easy as possible to use.
This is a blog post with the wonderful quilts and the people behind them.

Breanna lives in Ontario, Canada and has been quilting since she was ten. She spends most of her free time with her sewing machine or a good book. She started Rose & Ivy Quilts to sell her quilts when she realized she was making more than she could keep for herself.

@roseivyquilts

https://www.etsy.com/ca/shop/RoseAndIvyCo


I’m Coral, A contemporary quilter from South Wales, UK.  I made my first quilt over 10 years ago and have been hooked ever since.  I think it’s safe to say that my stitching skills have come a long way since that first quilt, but I still cherish that first quilt and the time that went into making it.

I have loved testing patterns for a number of designers over the last year.  It has encouraged me to step out of my comfort zone and try patterns a little different to what I would normally pick out.  The Dione Quilt was a dream to make, it looks fantastic as a scrappy quilt but also just as amazing with bold solid colours.

Coral used Moda Bella solids in tan, periwinkle and feather as well as a print from her stash.

See Coral's other makes on her instagram @valley.view.quiltco


Hi, I'm Kerry - a quilter, longarm quilter and fabric rescuer living in Kent. I'm also a wife to a long suffering carrier of fabric bolts and pawrent to Snoopy a 5 month old miniature sausage dog and Ronnie a 2 year old tabby cat.
I've been making quilts for almost 11 years now and in my 3rd year of being a longarm quilter. I help to run the Great British Quilter Instagram account, am the current website editor for Region 2 of The Quilters Guild and am a proud Pfaff brand ambassador, I love to talk about quilting and share my passion to anyone who wants to listen so I'm very grateful to have these wonderful platforms. I recently launched my new website, a very steep learning curve but an achievement I'm proud of, you can sign up to my newsletter Diagnosis Quilter - written by a quilter for quilters!
I made my version of the Dione Quilt using scraps in colours I don't usually sew with altogether, from some of my favourite designers/collections including Alison Glass, Helen Steele, Ruby Star Society and Libs Elliot.
Visit Kerry's website: www.thatssewkerry.com


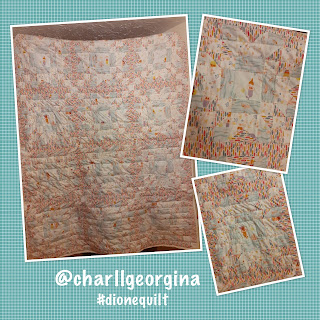
Hi, I'm Laura. I live in London with my family. I began quilting this past year, although I have been sewing all my life. I loved making the Dione Quilt for Stacey! I used Smol fabric from Ruby Star Society for my pattern test.


Although I've only been quilting for around two years and I am very much a beginner I felt assisted and guided throughout pattern testing the Dione quilt. With tips and hints for using directional fabric as well as tutorials for creating both the HSTs and flying geese there was Little room for error and I made a beautiful quilt I'm overjoyed with! The Dione quilt was a huge confidence boosting pattern with endless possibilities.
The blocks came together with speed and ease. I had been saving the Dashwood under the sea fabrics for a special quilt and love the movement and flow they have created. I added hand quilting in both silver and pink glitter and bright orange thread to mimic the waves of the sea. It's so fun!! 
Charlie xx


 If you fancy making your own Dione quilt, you can now buy the pattern in my Etsy store.
Mx

Thursday, 10 February 2022

Dione quilt pattern...


 I have been making sewing patterns for a couple of years now and love putting my ideas out into the world. As I make more and more quilts, it was a natural progression for me to create my own designs. I love to doodle ideas and it has been amazing to see them come to life in quilt form.

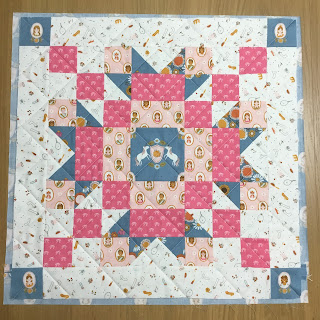
So here is my first quilt pattern, the Dione quilt...


The quilt pattern comes with the fabric requirements, cutting and construction instructions for 4 sizes. I chose to make the baby size using the cute 'Guinevere' fabrics from Riley Blake designs. I'm so pleased with how lovely this quilt looks, the photos really don't do the fabrics justice. I always love using prints so I wrote the pattern to be directional fabric friendly. 


It was then suggested to me that I make an extra large version of the block. So I did just that and made the Dione XL which comes in 2 sizes. I love the impact of the pattern on a large scale and like that it can showcase bigger prints with the scaled up pieces, plus the supersize block makes them so quick to make.


Again I chose to make a baby sized quilt, this time using some cute robots as the feature print, mixed with some basics in coordinating colours. I found the perfect backing to match too. 


The Dione quilt pattern is now available to purchase in my Etsy store, if you fancy making your own version. There is also a surprise second version of the quilt included in the pattern as I just couldn't resist playing with the design to give even more options!

 I am so excited to see all the different quilts people make using my pattern too so please tag me @craftylilmouse in your makes with the #dionequilt on Instagram. 

Mx

Wednesday, 9 February 2022

Binding Tutorial

As I release my first ever quilt pattern, I looked back on my blog tutorials to help people finish their quilts and decided it was time for an update . I wanted to share step by step instructions on how to cut, join and attach binding to complete a project for anyone needing a little extra guidance. 


My preferred method of binding, especially for big projects and quilts is this one. I cut 2 1/2" X WOF (width of fabric) strips. If necessary, I join the strips to create one length. You can use a straight join with the strips simply attached end to end, however, I prefer a 45° join as they are less bulky. To create the 45° join, take one strip on the wrong side and draw a line at 45° across the end. Lay this on top of your next strip, right sides together at 90° with the draw line across the outer corner. Pin together and sew along the marked line. Trim off the corner to leave a 1/4" seam and press open. Repeat as needed to create your continuous length of binding, then press in half lengthways.


 Take the pressed binding strip and position on the front of your project, with the raw edges of the binding aligned along the outer edge. I like to start the binding along the bottom edge as the join is usually less noticeable there. Clip or pin the binding in position along the first edge and start to stitch, leaving the first 4 - 5" of the strip loose. Use a 1/4" seam allowance along the raw edge and a walking foot on your sewing machine if possible (as this helps to feed the layers through evenly). 

For the corners, stop stitching 1/4" from the end. Then, fold the fabric 90° away from the project, creating a 45° fold at the corner. Holding the corner fold (you may wish to pin), flip  the binding 180° so it aligns with the next raw edge creating a neat 90° corner, covering the 45° fold inside. Clip in place and restart sewing from the corner edge, continuing to use the 1/4" seam allowance. Repeat for each corner until you come towards the final length of binding. You will need to leave a gap with loose end to join to the beginning of the strip. 

To join the strips on a project, lay the binding down flat across the unstitched gap. The binding should overlap. Measure and trim the ends so that they are a neat straight edge with an overlap of exactly 2 1/2".  

Then, open out the folded strips and mark a line 45° across one end. Making sure you don't twist the strips, position the marked end right sides together at 90° with the opposite end, held away from the edge of the project. Pin and stitch along the marked line, then open out to check the join is correct and will lay flat. If so, trim the corner off leaving a 1/4" seam and finger press open. Stitch the remainder of the binding to the project. 


With the front sewn on, the pressed edge of the binding can then be folded over to the back to be stitched down. This can be done by machine for speed, but I always prefer to hand sew using a ladder stitch for an invisible finish. Carefully fold over the binding one section at a time, using binding clips to hold in place. These can mark fabric if left on too long so just clip each section as you are sewing then remove. The binding shouldn't be pulled so it is too tight over the edge of the project, or be left loose. Once clipped in place, simply ladder stitch along the pressed edge onto the backing fabric. For the corners, sew down flat until you reach the edge of the project, then folding the excess in, fold the next edge over to create a mitred corner. Clip in place and continue stitching the folded edge of the binding, repeating at each corner until the binding is fully secured. The finished binding will look similar on both sides.
 
Mx

Cushion back tutorial

 I thought it's time to share an updated tutorial on how to make a zipped cushion back as my first ever quilt pattern is released today and includes a cushion size! I make a lot of cushions and wanted to show how I like to get a nice neat finish for the back for you to try on your own. Start with your finished cushion front and follow the cutting instructions below for the back sizes.

W= total width of cushion front + 1"
H= total height of cushion + 1"
Zip = width of cushion - 2"

For the bottom section (piece A), cut W x 2 1/2"
For the top section (piece B) cut W x H 

So, for a 20" square cushion, cut piece A @ 21" x 2 1/2" and piece B @ 21" square, with an 18" zip.


Lay your zipper teeth down onto the right side of piece A and pin in place, so the zipper tape lines up with the top edge of the fabric and is centred across the width. 

Stitch along the top edge with your zipper foot on your machine running along the edge of the teeth. Fold the fabric back, press and top-stitch along the edge of the zip. 


Lay piece B right side up with piece A right side down on top, so the zip teeth face down and the tape aligns with the bottom edge of piece B. Pin and sew using your zipper foot.
 
Now at each end of the zip, you are going to sew an 'L' shape to stop the zipper and create the concealed fold. With your fabrics still right sides together and the zip pull in the middle, mark 2 1/2" in from the side and 1" up from the bottom edge (as in the photo above). With both ends of the zip marked, sew along your marks ensuring you run across the zipper teeth a few times to make it extra secure. Now fold back your piece B and press carefully over the zip. 

Next, topstitch along the top side of the zip with the zipper foot running along the zipper teeth, stitching through all layers of the fabric flap to hold them in place. Make sure your cushion back is the right size and square.


 To join the back to the front, you first need to decide if you are binding the cushion or not. If binding, place the front and back pieces aligned wrong sides together and baste using a 1/8" seam allowance from the outer edge to hold the layers in place (as seen above). You can then trim the sides neatly and sew on the binding of choice to finish, covering the basting stitches around the edge. 

If you don't want to add binding, place your front and back right sides together, with the zipper open and stitch all the way around using a 1/4" seam allowance. Turn the cushion through the gap in the open zipper and press. As a nice alternative to binding or piping to give the cushion an extra finishing touch, I like to add a simple stitched border. I topstitch around the edges with a 1/4" seam on the turned through and pressed cushion, burying the threads at the end.
  
If you like the cushion pattern above, head over to my etsy shop to purchase the Dione Quilt pattern which includes 4 sizes from cushion up to a large throw !!
 
Mx