Friday 11 December 2020

christmas gift cushion

 There are so many present style patchworks about and most are free. However they weren't quite the right size and had extra seams... so I made my own and thought I'd share it here with you.

It is really simple patchwork and easy for a beginner, (an advanced stitcher will have it made in no time!)

So here we go... all measurements are height x width. Seam allowances are 1/4" unless otherwise stated. The finished cushion is 17" square, although larger borders could be added to make it bigger.

Background: cut 3@ 6 1/2" x 6 1/2"

                 2@ 9 1/2" x 3 1/2"

                 1@ 3 1/2" x 18 1/2"

Ribbon: cut 2@ 3 1/2" x 3 1/2"

            1@ 2 1/2" x 11"

            1@ 9 1/2" x 2 1/2"

Present: cut 1@ 8" x 11"


To assemble:


1.  Take a 3 1/2" ribbon square, on the wrong side of fabric draw a diagonal line from corner to corner. Place it on top of one of the 6 1/2" background pieces, right side together, and sew on the line across the corner.
2. Trim away the corner to leave a 1/4" seam allowance. 
3&4. Press seam open. Repeat for the other bottom corner.


5. Sew a 6 1/2" background square to both sides of the finished block, using a 1/4" seam allowance. Press seams away from the center.


6. Cut the present fabric in half horizontally. Place the matching ribbon piece in the middle and sew. Press seams open.

7. After stitching the ribbon, cut in half vertically this time. Add the next ribbon piece in the same way, this time press the seams in towards the centre. It will look like this...


8.  Place the 9 1/2" x 3 1/2" background pieces right side together on each side of the present. Press seams away from the centre.

 
9. Once you have the present section all sewn, add the ribbon section to the top. Press this seam open. Then add the remaining background piece to the bottom, press seam away from the centre, to complete the block.


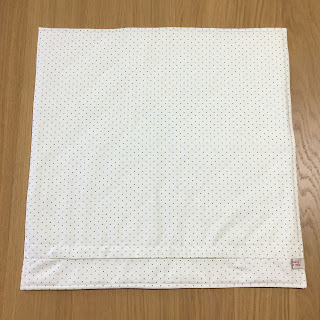
This is what the back will look like.


To finished my cushion, I quilted using a 2" grid on the diagonal. I made a cushion back using my method (find the tutorial here). To keep it simple I didn't add binding this time, choosing the turn it through method and adding a top stitch 1/4" in from the edge.


 I hope you liked the tutorial and I would love to see your finished projects too. Please tag me on social media @craftylilmouse and use the #craftylilmousepatterns
Mx


Monday 12 October 2020

finish-a-long Q3 finishes and Q4 plans!

 It was a bad quarter for finishes this time, i only managed to actually finish 3bthings from my list:

  • unicorn retreat pouch- finished Q3
  • memory cushions for a friend-finished in Q3
  • Ghost cushions- finished Q3
Going into Q4 though and im hopeful i will make more finishes. I will concentrate on my halloween and christmas projects, maybe a few extra will get finished though too:
  • postage stamp style cotton and steel quilt- almost done binding!
  • HST cotton and steel quilt- need to hand bind
  • halloween embroidery project and sew along 
  • pixie noel quilt- all patchwork is done and waiting to be quilted
  • my merry lil christmas swap parcel- made a good start but its a secret!
  • c+s christmas cushion, stocking & makers mat
  • polar bear cushion
  • christmas cross stitch
  • dashwood advent pouches
  • christmas bunting
  • snappy zip pouch for mobile
  • liberty cord and cork pouch/bag
  • pouch for dad
  • 2 doll house fabric quilts
  • sewing machine cover
  • floral car quilt
  • dog fabric car quilt
  • sugar plum/Trixie quilt
  • tasha noel skirt
  • adele dress
  • my meadowland cushion
  • liberty hst quilt
Lets see how many projects i get get finished before the new year. as always follow my progress on IG using the #craftylilmousefal2020 
Mx

Wednesday 30 September 2020

Birthday stitchers swap...what I received!


This blog post is well over due since it was my birthday in May! My only excuse is life got abit crazy this year but it mainly didn’t get written because I was too busy with my 100 day project, so it was put to the bottom of my to blog list. I love and use many of my gifts so I will finally share what I received ...

First up is this great quilted basket, it’s huge, which is fabulous for storing my hair dryer. It matches the quilt in my room and as well as looking pretty, is super useful.

Also to go in my bedroom is this beautiful unicorn cushion. It is an FPP pattern. If you follow me, it is well documented that I hate FPP, so I’m super pleased Tracy made it for me. 

Can you spot a bit of a theme... my next gift is a fabulous crochet unicorn. I have wanted one for so long, I even got bought the kit to make my own, however I just haven’t quite learnt to crochet yet... hopefully one day I will, since I have a kit to make a mouse. My unicorn has matching pink and navy hair however millie was far too interested in it. It is been put on a shelf in my craft room out of the reach of millie, after all it’s far too nice to be a dog toy.


The last handmade item I received was a lovely tote bag, Tracy used up some of the blush fabric to make it. It’s too nice to use for everything so I am saving it for lovely fabric shopping!

I also received some lovely bought gifts. Stationary, which is also great. And an ‘s’ mug and coaster which are perfect for my hot chocolate.

Overall I was super pleased with my gifts and it definitely helped make my birthday special since I couldn’t have a party.

Mx 

Saturday 5 September 2020

Zippy tube pattern


I have released a few patterns recently on Etsy for digital download (shop here) but I thought I would share my latest creation on here for free!! Below are my measurements and template, simply save the jpeg below and print on a4 landscape, no scaling !!


I am not sharing all of the step by step instructions, as I came across a great little free video tutorial for a similar construction method ... Find it HERE!

If you fancy making your own pouch, please use my measurements and the above tutorial, along with these few little extra tips: 
  • Quilt the main body panels after inserting the zip
  • Add heavy interfacing into the spine and quilt to give it extra structure since it’s tall 
  • Baste the spine lining piece before quilting to hold it in place neatly
  • Hand-stitch the binding for a neater finish than on the machine


The pouch is a nice big size with plenty of room for stationary, sewing tools and supplies or even cosmetics. It's also easy to adjust the height by tweaking the bottom side panel and spine pieces to your requirements. With the one below, I also added a mesh pocket into the top section with fold over elastic on the top edge of the mesh, basted into place and trimmed after quilting the top panel, before attaching to the side panel. 


Find inspiration and share your makes on Instagram using #zippytubepouch and most of all enjoy sewing!!

Mx

Saturday 18 July 2020

Q2 update and Q3 list...

I can't believe it's time again to be doing the finish-a-long list, but here goes...

  • My list for Q2 including what progress I've made:
  • A postage stamp style quilt using 4.5” squares- waiting to be quilted.
  • A hst quilt- a bit of sewing but not much progress.
  • A wonderland fabric quilt- no progress.
  • A half square triangle cushion- finished!
  • My unicorn retreat pouch, been cut ready to sew for a couple of years, just finished!!
  • A pin badge banner- done and gifted for my sisters birthday.
  • A tote bag- finished and I love it
  • Scrappy pouch- kind of done. Instead I made 2 non scrappy.
  • Hopefully another quilt- turns out it was the only quilt to be finished within my 3 months, see it here!
  • Millie’s cool mat cover- done.
  • A bag for my nanas birthday for her knitting- done and she loves it!
  • A pouch for Father’s Day- just bought a gift will make for christmas instead.
  • My #snappyzippouch for my phone, because it’s all ready to sew and even been floating on my desk for a month... still not done.
  • My liberty cord and cork pouch, part way through sewing and it’s a shame to leave it much longer... still not done.
  • A basket for my basket- done and all pins attached, I love it!

I also hosted a sew along for my latest sewing pattern, which is an embroidery pattern. I  made a banner, with stitching videos and a couple of wood burning pieces.

My full finish-a-long list (still excluding some quilts or the list would be too long):
  • unicorn retreat pouch (slight cheat since I finished it now but its not in time for Q2!)
  • postage stamp style cotton and steel quilt
  • HST cotton and steel quilt
  • snappy zip pouch for mobile
  • liberty cord and cork pouch/bag
  • pouch for dad
  • 2 doll house fabric quilts
  • makers mat
  • xmas cushion
  • halloween cushion
  • polar bear cushion
  • christmas cross stitch
  • dashwood advent pouches
  • christmas bunting
  • floral car quilt
  • dog fabric car quilt
  • sugar plum/Trixie quilt
  • pixie noel quilt
  • tasha noel skirt
  • adele dress
  • my meadowland cushion
  • liberty hst quilt
  • memory cushions for a friend
I have organized a merrylilchristmas swap, so I have my gifts to make and buy for that.
Also I will be releasing a new Halloween inspired embroidery pattern and hosting a sew along in October! 

So, for this Q3 I will concentrate on the two cotton and steel quilts and the 2 doll house quilts. I'll also do the memory cushions, liberty pouch/bag, makers mat and Halloween projects. Hopefully the swap parcel will get started and anything else little I can do in between my quilts!
You can follow my finish a long progress on instagram following the #craftylilmousefal2020
Mx

My #100daysusingcottonandsteel project finished!

Let’s face it my #100dayproject2020 did not go entirely to plan. There's some projects on my list I intended to do and didn't, some I actually finished and a few I started, but are still in progress. So here's a run down of the projects I made...

The postage style quilt- I was super pleased to get it slightly bigger than I expected at 84 inches square. This was 441 4” squares in the end! I chose a quilting design that needs custom quilting by a long armer and there was quite a wait list, so it will be a while before I get it back to bind and finish. We will all just have to wait a while for those photos, but here is the finished top before the quilting!

The scrappy triangle cushion- this was finished early in the project. I pieced and then hand quilted it. I am super happy with how it looks and it's now in full use in the lounge. Tutorial blog for that is here!

Patchwork tote- well this was worked on a little in the middle of the 100 days but left until the last push to actually finish. I went with using only melody miller designed fabrics in the end and love the way it turned out.

Pin badge banner- made for my sisters birthday. I have been wanting to make one for ages, so I’m pleased I have made one now. I added a rainbow panel to the top for some fun colour. I also made her a key ring with the perfect selvage too!

A rainbow jelly roll quilt- so technically I didn’t use a jelly roll at all, which would have made it so much easier. Anyways, I am so happy with my new quilt. You can see and read more about it here including where to get the free pattern to make your own!

Selvedge cushions- I always wanted to use the fun selvedges from my stash but I wasn’t sure what for exactly. I took inspiration from a quilt a lady was making on instagram. I didn’t have any where near enough for a quilt, so I made a pair of cushions instead. They look so fun with my quilts and other cushion in the lounge.

I made 2 pouches- one to join in with a sew along, (although I didn’t like the original size so changed everything.) I made another where I supersized the idea to be a pencil case, again using all my own measurements and a different construction method to make it work.

A fabric bookmark using a few scraps, which I was going to give away but ended up keeping in the end... I did gift something else instead !!

I also made a few smaller projects: a #weeboxybasket (pattern by sweet cinnamon roses), 2 key rings using selvedges, which feature the fun text and prints to make them extra special for myself and mum and a simple hair ribbon, made using lawn fabric for extra softness.

It wasn't just me using my cotton and steel stash in the 100 days... My mum used my mini travel pinnie pattern (available in my Etsy store here) to make a gift for my sister.
My sister is also in the middle of using my stash to make herself a quilt too! I didn’t take photos to share but I finished cutting out my entire ice cream soda Epp quilt. I also cut out and have started a triangle quilt, more will be shared for that soon, hopefully. I also used some stash doing a giveaway of 70 precut hexies. 

So overall during the project I might not have finished everything but I feel like I got a lot made so I’m happy with that. I did however end up purchasing a few bits, mainly large cuts for backings and a few basics. This definitely wasn’t helpful in reducing my stash. In fact even though I have made so many things, including cutting out 5 quilts, I still don’t look to have used much!
I learnt I actually like doing my other hobbies still and miss them if I give something else too much attention. I also feel a little lost now my challenge is over and my focus has been removed.
I think going forward I need to set smaller goals to get the sense of achievement, but definitely make time for other activities I enjoy too. 
Mx

Tuesday 14 July 2020

My rainbow jelly quilt!


I saw this rainbow jelly roll quilt pattern, designed by ruby star society, on Instagram. Ruby star society hosted a quilt along and I was so desperate to take part. Unfortunately I had too many projects started already, but I couldn’t resist any longer, especially since it is a free download from the moda fabrics website here

Technically I didn’t use a jelly roll at all, which would have made it so much easier. Instead I stuck with my 100 days using cotton and steel project and used some of my stashed cotton and steel prints. My sister helped me raid my stash and find the fabrics that were long enough. We then put them into block combinations with little ombré colour groups and cut the strips to size. It took a while to cut out but it was worth the extra effort. I also made more work for myself by making 2 extra blocks (20 more stripes) to make the finished quilt longer. Luckily, I wasn’t too difficult to piece together although the blocks are quite large and I wish my quilting ruler was longer for the sub cutting! I'm pleased I made it bigger though as it definitely makes it a more useable size for us as a family. 


We had a nice bit of sunshine when I finished the top so I managed to get photo in the garden before it was sent away to be quilted. I sent it away to Cath at Cumbria long arm quilting for some of her magic. Although the quilt wasn't huge, I didn't really fancy quilting it myself and I love the swirl design we picked for the quilting. The swirls are much more decorative than I could do and think they work lovely with the patchwork. Cath attached the binding to the front and I sat with a few films to hand stitch the binding to the back. 


I am so pleased with my final quilt and it is on the sofa with my catty corner quilt, looking great together!

Mx

Sunday 26 April 2020

scrappy triangle cushion

I made this cushion using my cotton + steel fabrics as part of my #100dayproject on Instagram. I grouped the fabrics into colour families and pieced half square triangles around a central economy block to create the design. The cushion finishes up at 18". If you would like to make your own, here's how to do it …


To create the patchwork, you will need to cut: 

1 blue square @ 4 3/4"

4 yellow triangles
8 navy triangles
20 cream triangles
20 pink triangles
12 peach triangles
4 teal triangles

 For the half square triangles, I use the easy angle ruler and cut to a 3 1/2". If you don't have this ruler, cut squares at 3 7/8th" and split on the 45 degree angle. 


For the economy block, position the first two triangles opposite each other, RST onto the central square. Align along the outer edges, pin and sew. Press open, then repeat for the remaining two sides as seen above. Trim the finished block to a square (this should be 6 1/2"). 


 To construct the half square triangle blocks, place two triangles RST, pin and sew along the long edge. Press open and trim to a square, removing the dog ears on the corners. Ensure all of the half square triangle blocks are the same size (this should be 3 1/2"). 


To put the cushion top together, I like to lay out all of my cut pieces to check I'm happy with the layout. I then stitch the centre block, followed by the surrounding half square triangles. I like to chain piece, so I prep all of the blocks and then stitch and press in stages. To join the blocks, I group into 4 patches around the centre, then piece together as shown above. 


I chose to hand quilt the top to highlight the diamonds created by the colours. I used aurifil 12WT and echo quilted, using a large quilting hoop to help with the tension as I stitched. Of course, you could machine quilt if your preferred. 


To finish the cushion, I created a concealed zip back (tutorial post here) and bound the edges with 2 1/4" binding (binding tutorial post here) for a neat finish to coordinate with my catty corner quilt (see here).


I'm pretty pleased with how this turned out and Millie approves too. I hope this blog helps you to create your own version. Of course, you can switch around the colour schemes for completely different looks to make use of your fabric scraps. 

Mx